Learn Webpack 5.x in One Article
Preface
Web frontend development relies heavily on webpack.
As we all know, webpack has many complex configurations —
you could even have a dedicated “webpack configuration engineer.”
This article focuses on webpack core concepts
and commonly used configurations in business development,
aiming to teach you webpack usage and configuration in one article.
Common Documentation
webpack guides: Follow the documentation step by step
webpack concepts: Common webpack concepts
webpack configuration: Look up webpack configuration options
Tutorial Approach
To get up to speed quickly, instead of starting from concepts like other articles,
we’ll start directly from hands-on code. Practice code: https://github.com/insistime/webpack-guides
You can clone it locally:
git clone git@github.com:insistime/webpack-guides.git ./webpack-guidesThe workflow is as follows:
- Checkout the corresponding tag, e.g., tag 0.0.4
git checkout 0.0.4- Install dependencies (different code requires different dependencies)
npm i-
Read the code alongside the explanations
-
Practice on your own
Installation
webpack is a build tool,
so install it as a devDependency:
npm i -D webpack webpack-cliAfter installation:
  "devDependencies": {
    "webpack": "^5.59.0",
    "webpack-cli": "^4.9.1"
  },
Code: https://github.com/insistime/webpack-guides/tree/0.0.4
Entry and Output
entry: The entry point. You can configure single or multiple entries.
output: The output configuration for filename, path, etc.
In this example,
the entry is the index.js file under the src folder,
and the output goes to main.js in the dist folder:
const path = require('path');

module.exports = {
  entry: './src/index.js',
  output: {
    filename: 'main.js',
    path: path.resolve(__dirname, 'dist'),
  },
};
Code: https://github.com/insistime/webpack-guides/tree/0.0.4
Configuration File
webpack usage generally relies on a configuration file.
Create a webpack.config.js file
with the entry and output example content shown above.
Code: https://github.com/insistime/webpack-guides/tree/0.0.4
Build Script
After installing webpack and preparing the configuration file, how do you build?
Add a script in package.json:
  "scripts": {
    "build": "webpack --config webpack.config.js"
  },
Then run:
npm run buildResult:
Code: https://github.com/insistime/webpack-guides/tree/0.0.4
Testing the Result
Manually create an HTML file to test. You can open it by double-clicking:
<!DOCTYPE html>
<html>
  <head>
    <meta charset="utf-8" />
    <title>Getting Started</title>
  </head>
  <body>
    <script src="main.js"></script>
  </body>
</html>
Result after opening:

Code: https://github.com/insistime/webpack-guides/tree/0.0.4
Checkpoint
So far, we’ve learned:
-
webpack - Installation
-
webpack - Configuration file
-
webpack - Build
-
webpack - entry
-
webpack - output
Code: https://github.com/insistime/webpack-guides/tree/0.0.4
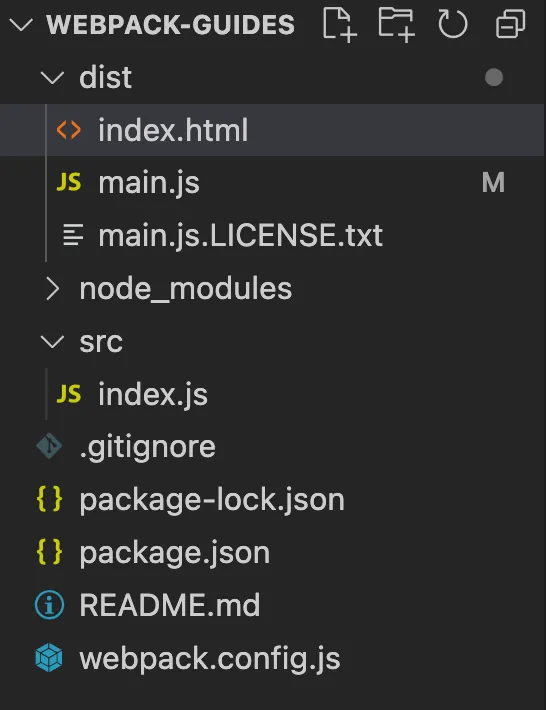
File structure:
Module
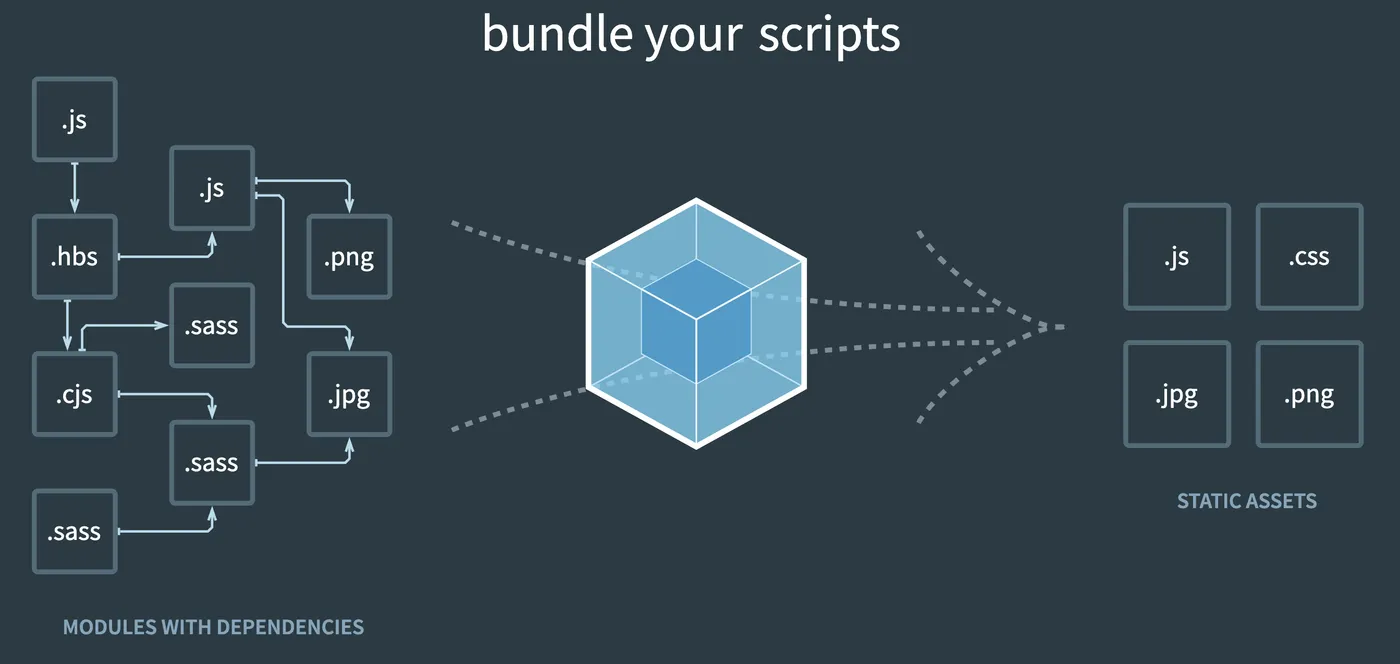
webpack’s philosophy is that all resources used in web frontend development are modules.
So through webpack configuration,
you can load and use almost any resource in frontend code.
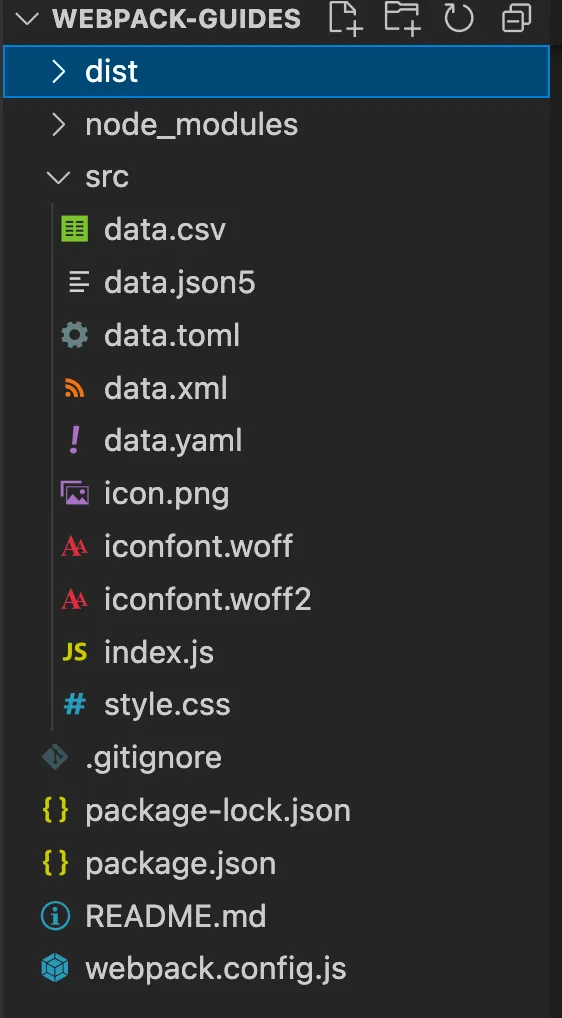
For example, here JS imports CSS, PNG, XML, and other resources:
import _ from 'lodash';
import './style.css';
import Icon from './icon.png';

import Data from './data.xml';
import Notes from './data.csv';

import toml from './data.toml';
import yaml from './data.yaml';
import json from './data.json5';

console.log(toml.title); // output `TOML Example`
console.log(toml.owner.name); // output `Tom Preston-Werner`

console.log(yaml.title); // output `YAML Example`
console.log(yaml.owner.name); // output `Tom Preston-Werner`

console.log(json.title); // output `JSON5 Example`
console.log(json.owner.name); // output `Tom Preston-Werner`

function component() {
  const element = document.createElement('div');

  // Lodash, now imported by this script
  element.innerHTML = _.join(['Hello', 'webpack'], ' ');
  element.classList.add('hello');

  // Add the image to our existing div.
  const myIcon = new Image();
  myIcon.src = Icon;

  element.appendChild(myIcon);

  console.log(Data);
  console.log(Notes);

  return element;
}

document.body.appendChild(component());
Code: https://github.com/insistime/webpack-guides/tree/0.0.9
Loader
Loading resources mostly requires loaders.
For example, loading CSS files requires style-loader and css-loader:
      {
        test: /\.css$/i,
        use: ['style-loader', 'css-loader'],
      },
Loaders are not built into webpack,
so you need to install the corresponding loader before using it:
npm i -D style-loader css-loaderThis is just the beginning —
you’ll find that using webpack requires installing many dependencies.
Code: https://github.com/insistime/webpack-guides/tree/0.0.9
Asset
webpack also noticed the problem of too many dependencies,
so it built some of the most common ones into webpack itself.
In webpack 5.x, some loaders are built in.
For example, the old file-loader, url-loader, and raw-loader
now correspond to asset/resource, asset/inline, and assets/source in webpack 5.x.
So in webpack 5.x, the configuration for images and fonts is:
      {
        test: /\.(png|svg|jpg|jpeg|gif)$/i,
        type: 'asset/resource',
      },
      {
        test: /\.(woff|woff2|eot|ttf|otf)$/i,
        type: 'asset/resource',
      },
Code: https://github.com/insistime/webpack-guides/tree/0.0.9
Checkpoint
So far, we’ve learned:
-
webpack - module
-
webpack - loader
-
webpack - asset
Code: https://github.com/insistime/webpack-guides/tree/0.0.9
File structure:
Plugin
In the first checkpoint above, the HTML file was created manually.
That process is cumbersome.
webpack’s plugin mechanism solves this problem nicely.
The plugin we’ll cover here is html-webpack-plugin.
Yes, you still need to install it before using it:
npm i -D html-webpack-pluginThen configure it:
const path = require('path');
const HtmlWebpackPlugin = require('html-webpack-plugin');
module.exports = {
entry: {
index: './src/index.js',
print: './src/print.js',
},
plugins: [
new HtmlWebpackPlugin({
title: 'Output Management',
}),
],
output: {
filename: '[name].bundle.js',
path: path.resolve(__dirname, 'dist'),
clean: true,
},
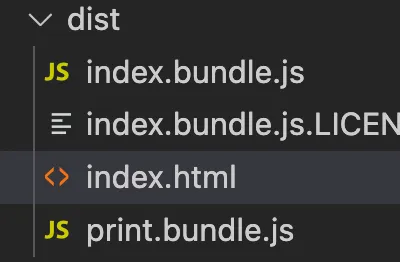
};After building, you’ll find that an HTML file is automatically generated in the dist folder:
Here’s a brief comparison of loader and plugin:
loader: A tool for loading resources into webpack.
plugin: A tool for extending webpack’s capabilities.
These capabilities are generally non-core features.
Code: https://github.com/insistime/webpack-guides/tree/0.1.3
Revisiting Entry and Output
You’ll notice the example above generated two JS files,
and the JS filenames were also changed.
This relies on the entry change:
  entry: {
    index: './src/index.js',
    print: './src/print.js',
  },
And the output change:
output: {
filename: '[name].bundle.js',
path: path.resolve(__dirname, 'dist'),
clean: true,
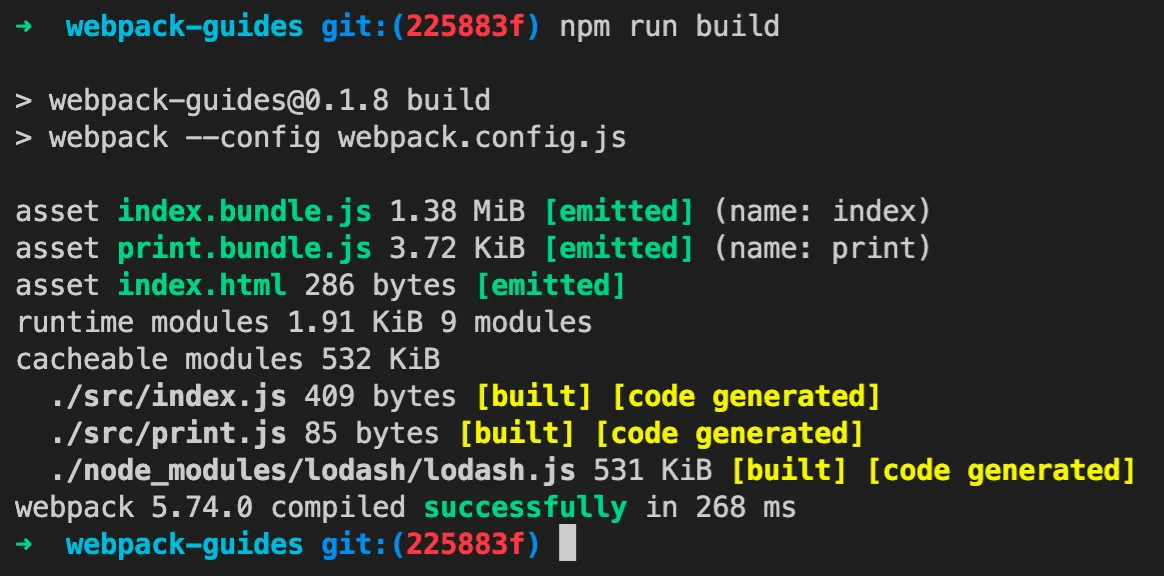
},You can see that entry now has two entry points.
The output filename uses [name] to represent the original filename.
The output adds a clean property, which cleans the dist folder before each build.
Code: https://github.com/insistime/webpack-guides/tree/0.1.3
Checkpoint
So far, we’ve learned:
-
webpack - plugin
-
webpack - entry, multiple entries
-
webpack - output, [name]
-
webpack - output, clean
Code: https://github.com/insistime/webpack-guides/tree/0.1.3
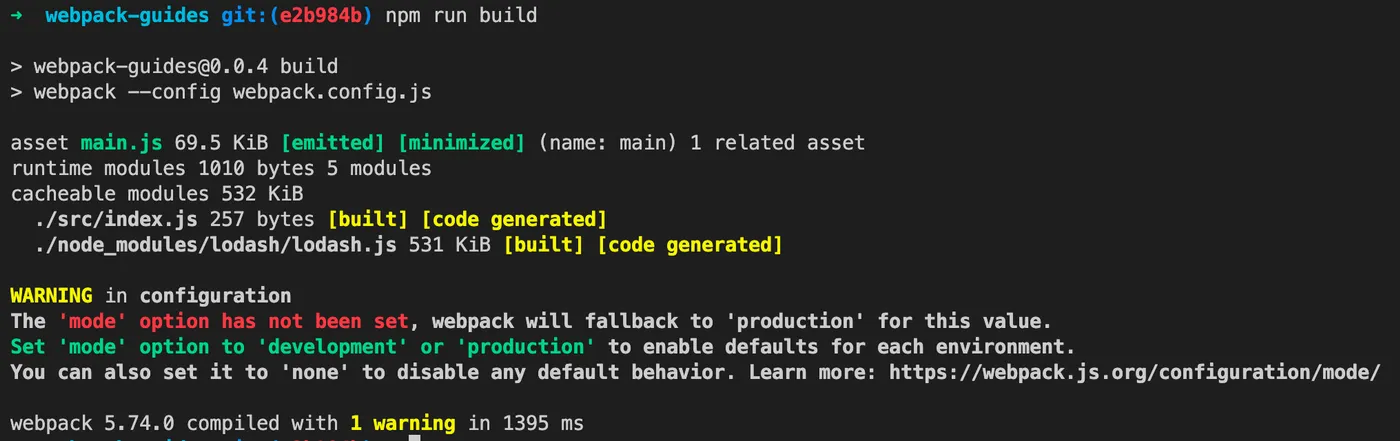
Mode
The code above builds without issues,
but there’s always a warning like this:

The warning is clear — mode is not set.
webpack’s mode tells webpack which mode to use,
such as development or production. See: https://webpack.js.org/configuration/mode/#mode-development
The differences are roughly whether to minify, build to memory vs. files, etc.
Set a mode like this:
mode: 'development',Build again, and the warning is gone:
Code: https://github.com/insistime/webpack-guides/tree/0.1.8
Watch
webpack has a built-in watch feature — no extra dependencies needed.
Add a watch script:
"watch": "webpack --config webpack.config.js --watch"Run the watch script:

Modify files under src, and webpack will automatically rebuild:
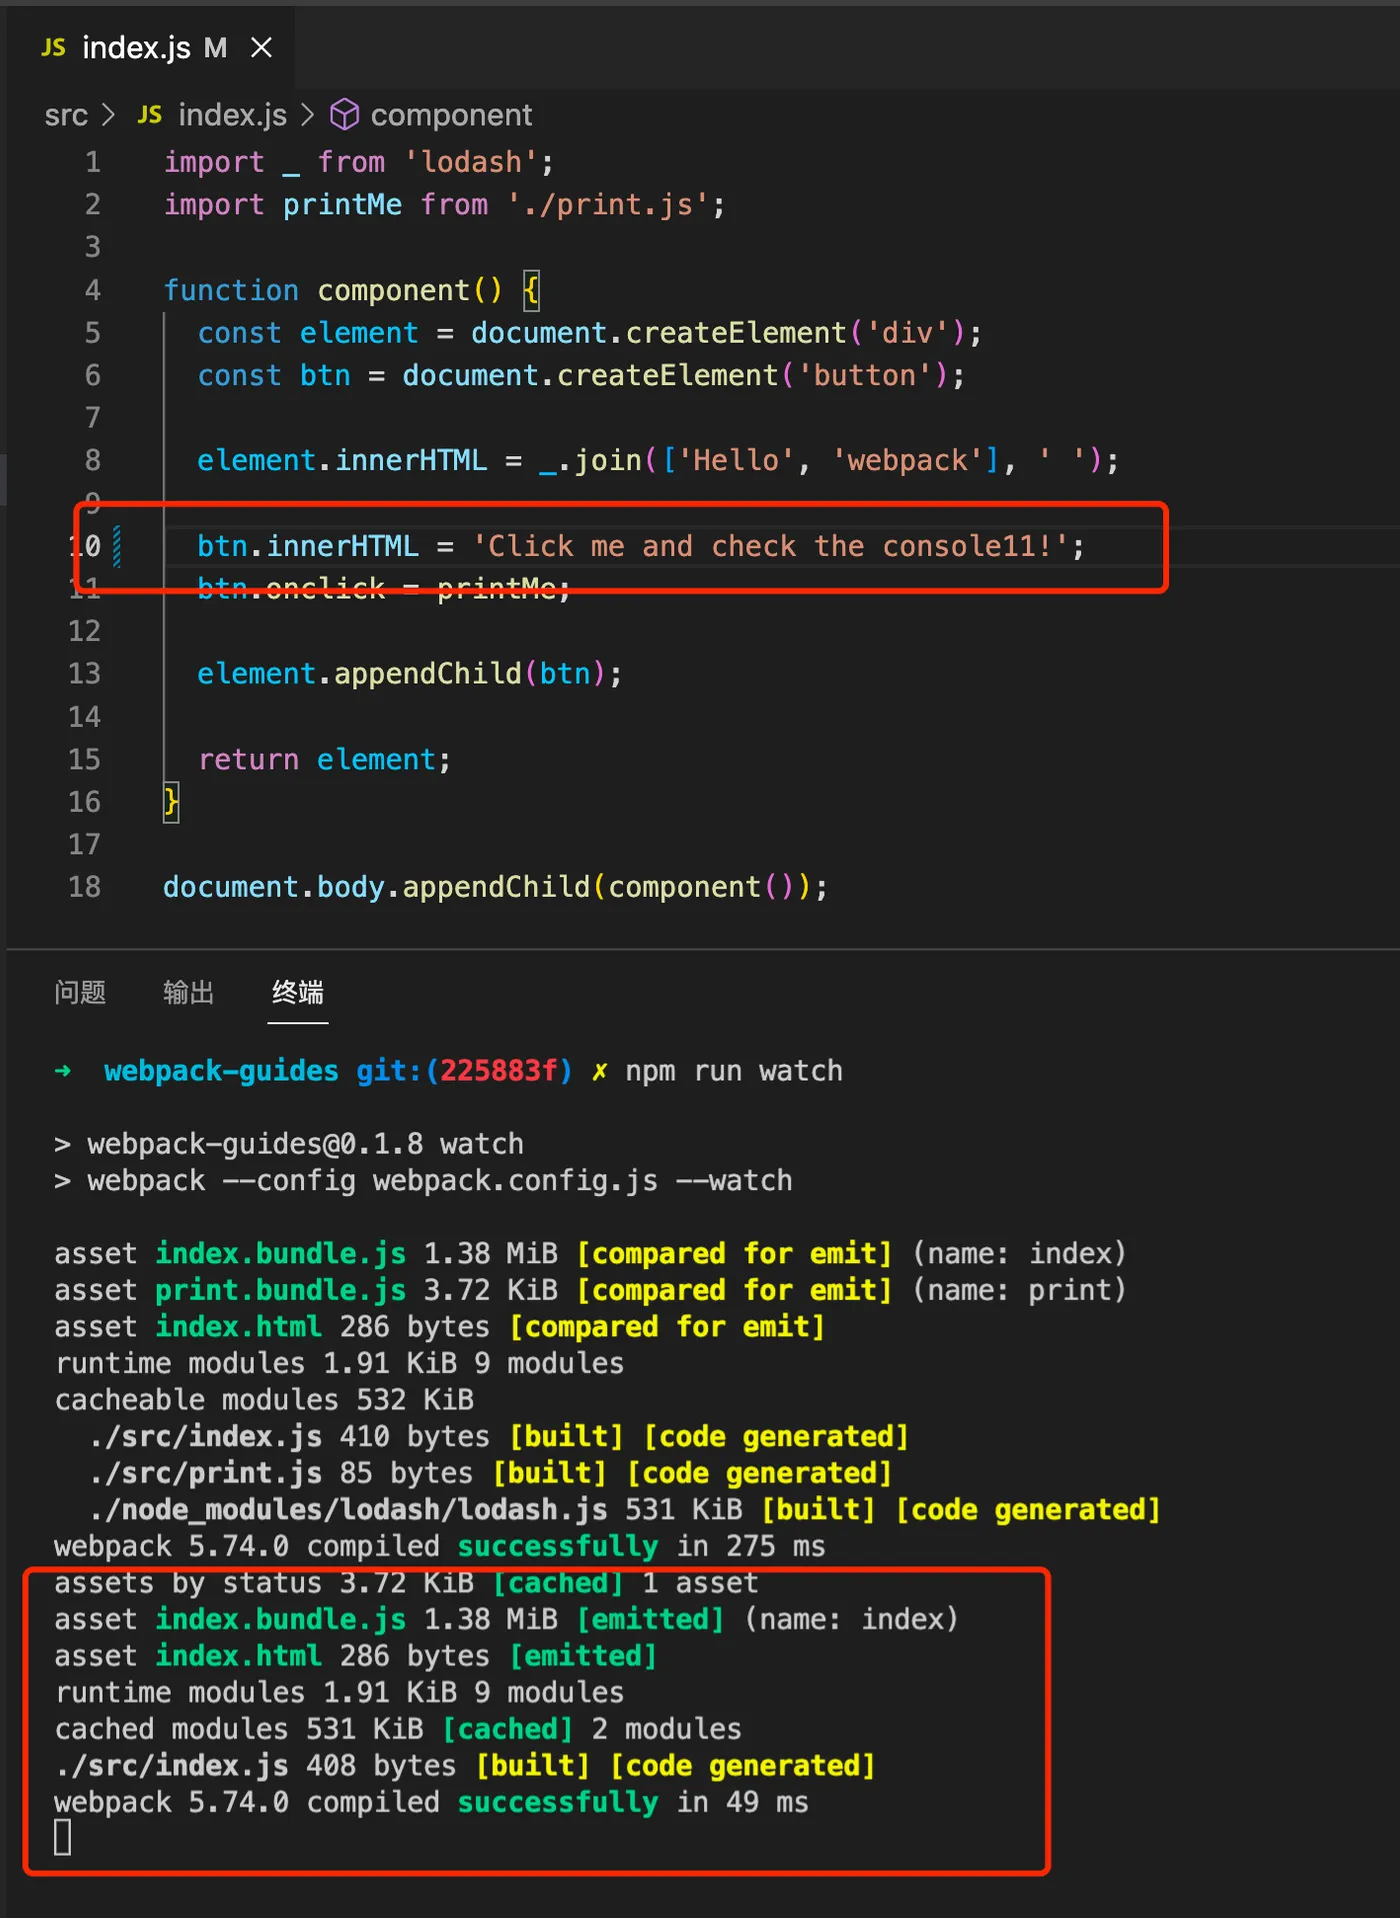
So watch monitors file changes and automatically rebuilds.
Code: https://github.com/insistime/webpack-guides/tree/0.1.8
Watch in Practice
At this point you’ll notice a problem — we’ve been opening HTML files by double-clicking,
meaning we preview HTML via the file protocol directly in the browser,
not through an HTTP server.
In practice, you need a server to serve the HTML files.
Here we’ll temporarily use pm2 as a substitute.
For pm2 usage, see this article: Learn pm2 in One Article
Install pm2:
npm i -g pm2Run the HTML files:
cd dist
pm2 serve .
pm2 will run a server serving the contents of the dist folder:

You can see it uses port 8080,
so you can access it locally via port 8080:

The watch workflow in practice:
-
npm run watch
-
pm2 serves the dist folder
-
Access port 8080 to see the result
-
Modify files under src
-
Refresh the page to see the effect
Code: https://github.com/insistime/webpack-guides/tree/0.1.8
devServer
Do you really need to set up pm2 alongside webpack?
Actually, webpack already provides a development server for you.
Install the dependency:
npm i -D webpack-dev-serverAdd the configuration:
  devServer: {
    static: './dist',
  },
Add the script:
"start": "webpack serve --open",Run devServer:
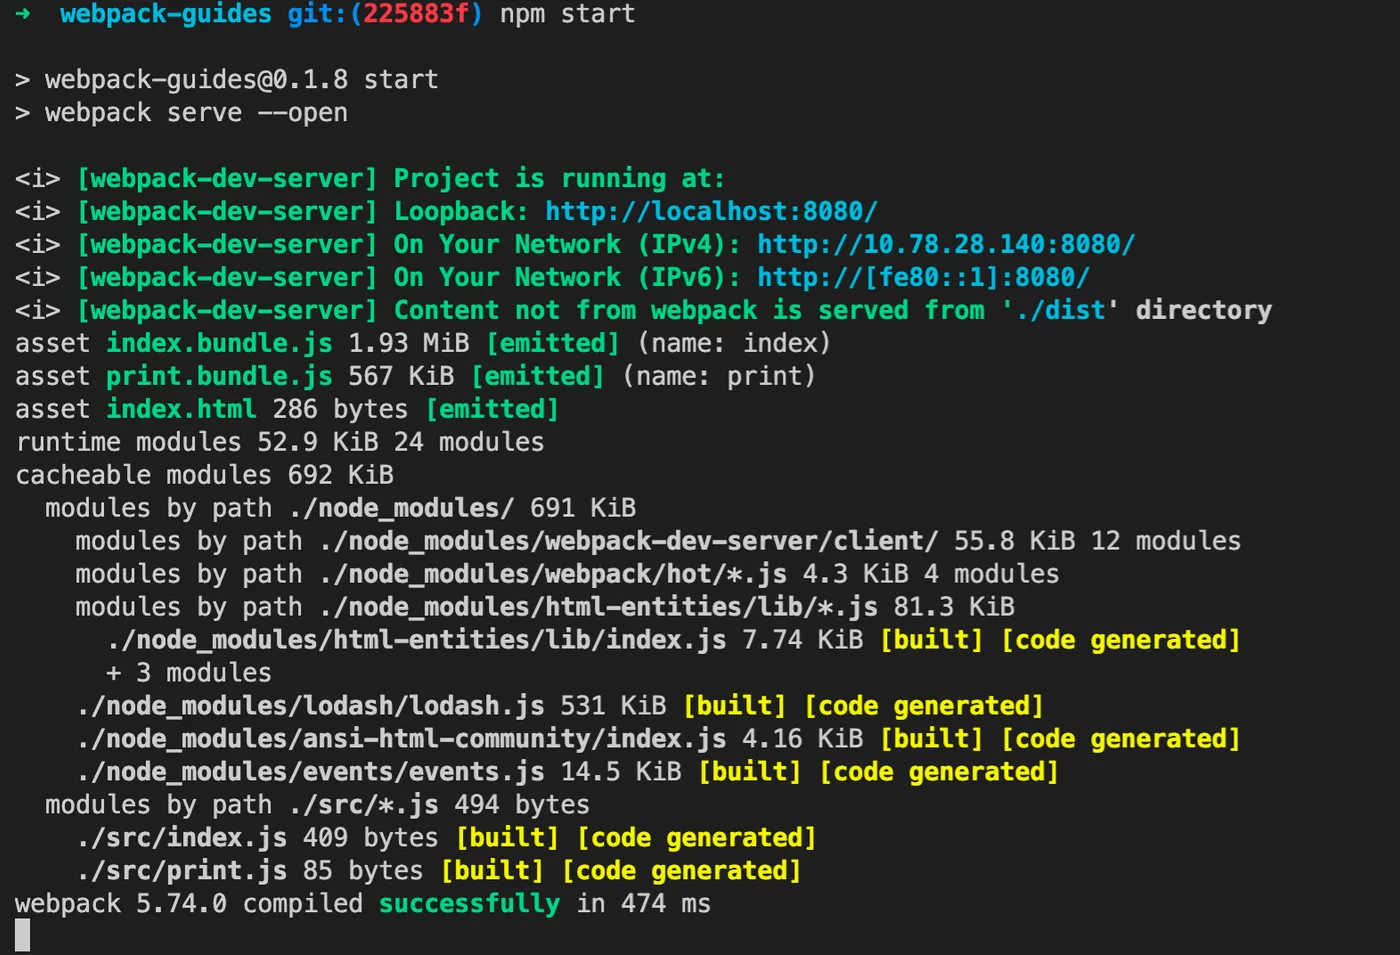
What does webpack-dev-server do?
-
Build files
-
Start a server to serve files from dist
-
Open the browser
-
Watch for file changes
Essentially, webpack-dev-server is watch + pm2 combined.
See: https://www.npmjs.com/package/webpack-dev-server
The development workflow now becomes:
-
npm run start
-
Access port 8080 to see the result
-
Modify files under src
-
Refresh the page to see the effect
Code: https://github.com/insistime/webpack-guides/tree/0.1.8
Checkpoint
So far, we’ve learned:
-
webpack - mode
-
webpack - watch
-
webpack - devServer
Code: https://github.com/insistime/webpack-guides/tree/0.1.8
Code Splitting
If two JS files both import a common JS library, such as lodash:

The current build result looks like this:

Both files are large because they both contain the lodash library.
Code: https://github.com/insistime/webpack-guides/tree/0.1.9
How do you extract this common library? Modify the configuration:
  optimization: {
    splitChunks: {
      chunks: 'all',
    },
  },
Run again, and lodash has been extracted:

Code: https://github.com/insistime/webpack-guides/tree/0.2.0
Checkpoint
So far, we’ve learned:
- webpack - code splitting
Code: https://github.com/insistime/webpack-guides/tree/0.2.0
Basics Summary
webpack has more concepts beyond this,
such as caching, tree shaking, production, etc.
But those are optimization topics. The basics are now covered.
To summarize, we’ve learned:
-
webpack - Installation
-
webpack - Configuration file
-
webpack - Build
-
webpack - entry
-
webpack - output
-
webpack - module
-
webpack - loader
-
webpack - asset
-
webpack - plugin
-
webpack - mode
-
webpack - watch
-
webpack - devServer
-
webpack - code splitting
React
With webpack basics complete, there are generally two directions going forward:
-
Optimize webpack configuration for production environments
-
Use webpack in development practice, e.g., how to use webpack with a React project
Here’s a simple React code example for demonstration:
const React = require('react');
const ReactDOM = require('react-dom');

ReactDOM.render(<h1>Helloo, world!</h1>, document.getElementById('root'));
Install dependencies:
-- react
npm i react react-dom

-- babel
npm i -D babel-loader @babel/core @babel/preset-react
Modify configuration:
  module: {
    rules: [
      {
        test: /\.(js|jsx)$/,
        exclude: /node_modules/,
        loader: 'babel-loader',
        options: { presets: ["@babel/preset-react"] }
      },
    ],
  },
Build successful:

Code: https://github.com/insistime/webpack-guides/tree/1.0.3
Sass
Besides React, CSS frameworks are also essential.
Here we use Sass as an example to demonstrate webpack configuration.
The code imports an additional SCSS file:
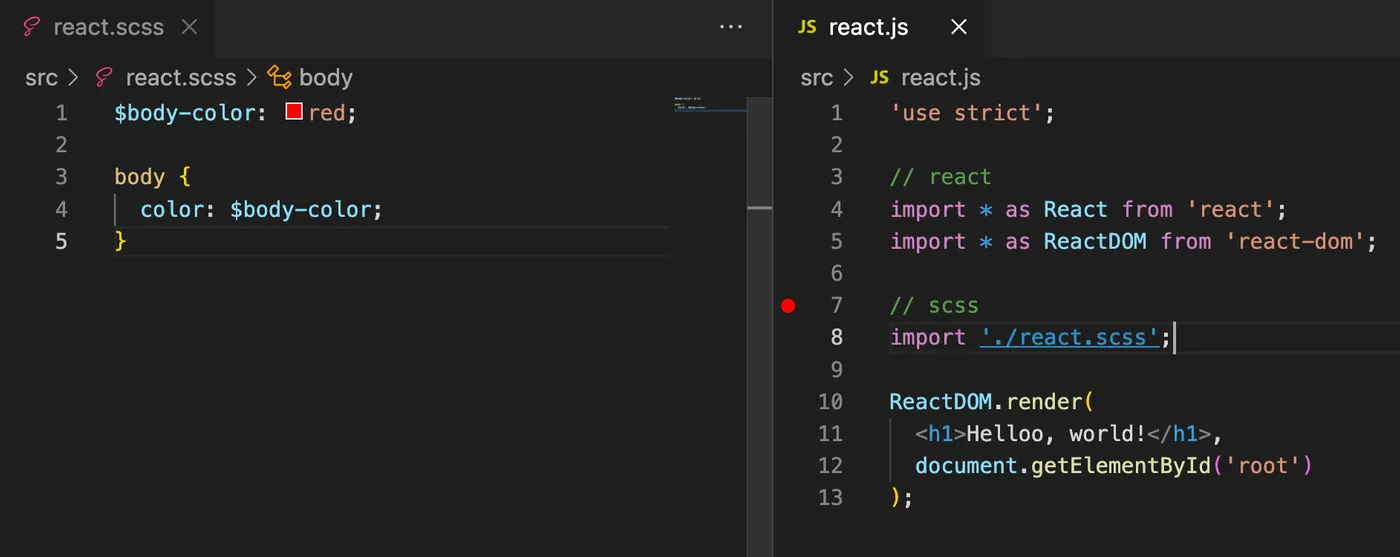
Install dependencies:
npm i -D sass sass-loader css-loader style-loaderModify configuration:
      {
        test: /\.scss$/i,
        use: [
          "style-loader",
          "css-loader",
          "sass-loader",
        ],
      },
Build successful:
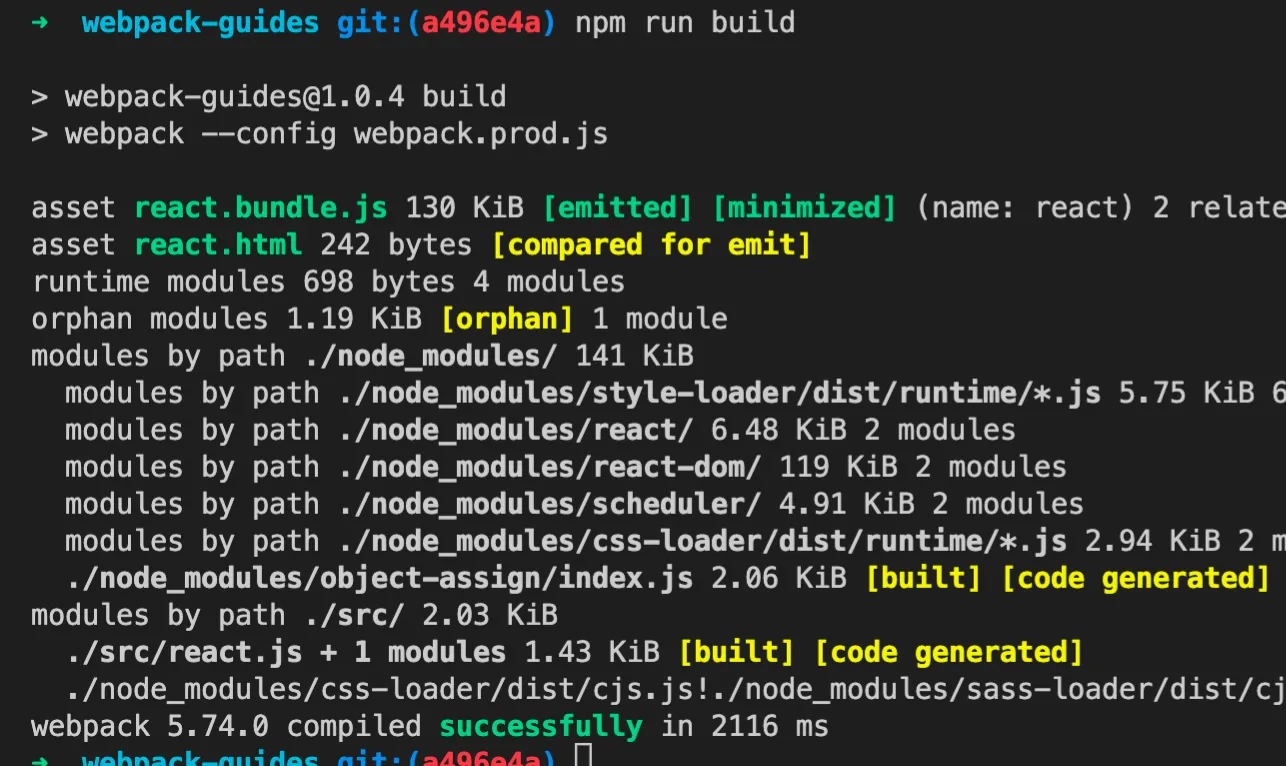
Code: https://github.com/insistime/webpack-guides/tree/1.0.4
Checkpoint
So far, we’ve learned:
-
webpack - React configuration
-
webpack - Sass configuration
The Problem
At this point, you’ll notice a problem.
In development practice, webpack depends on many other npm packages, like this:
  "devDependencies": {
    "@babel/core": "^7.17.5",
    "@babel/preset-react": "^7.16.7",
    "babel-loader": "^8.2.3",
    "css-loader": "^6.7.1",
    "html-webpack-plugin": "^5.5.0",
    "imports-loader": "^3.1.1",
    "sass": "^1.49.9",
    "sass-loader": "^12.6.0",
    "style-loader": "^3.3.1",
    "webpack": "^5.65.0",
    "webpack-cli": "^4.9.1",
    "webpack-dev-server": "^4.6.0",
    "webpack-merge": "^5.8.0"
  },
Imagine you’re maintaining 5 such projects.
That means 5 copies of similar dependencies.
Take html-webpack-plugin for example —
it could exist in all 5 projects,
and you’d need to keep it updated to the latest version.
That’s quite painful.
qiao-webpack
A wrapper npm package was created for this. Feel free to use it: https://qiao-webpack.vincentqiao.com/#/
- Built-in image parsing rules, with files smaller than 4k using base64 encoding
- Built-in CSS parsing rules: style-loader in dev, mini-css-extract-plugin in non-dev
- Built-in Sass parsing rules using sass-loader
- Built-in Less parsing rules using less-loader
- Built-in PostCSS parsing rules using postcss-loader
- Built-in React parsing rules using babel-loader
- Built-in antd on-demand loading using babel-plugin-import
- Built-in html-webpack-plugin for generating HTML files, configured via plugins
- Built-in mini-css-extract-plugin for extracting CSS files, configured via plugins
- Uses css-minimizer-webpack-plugin to minify CSS and terser-webpack-plugin to minify JS
Summary
-
webpack - Installation
-
webpack - Configuration file
-
webpack - Build
-
webpack - entry
-
webpack - output
-
webpack - module
-
webpack - loader
-
webpack - asset
-
webpack - plugin
-
webpack - mode
-
webpack - watch
-
webpack - devServer
-
webpack - code splitting
-
webpack - React configuration
-
webpack - Sass configuration
-
webpack - Out-of-the-box tool: qiao-webpack, https://qiao-webpack.vincentqiao.com/#/
-
webpack - Guides and blog column: https://blog.csdn.net/uikoo9/category_11471307.html