Learn IndexedDB in One Article

Table of Contents
Introduction
IndexedDB is a database that can be used directly on the web. See: https://developer.mozilla.org/zh-CN/docs/Web/API/IndexedDB_API
IndexedDB vs LocalStorage
Previously we covered LocalStorage: Learn localStorage in One Article
In most scenarios, LocalStorage is sufficient, but it still has some limitations.
Here’s a comparison between IndexedDB and LocalStorage:
Storage Size
|—LocalStorage: 5 MB max
|—IndexedDB: 250 MB+
Database Features
|—LocalStorage: Only stores data, no other features
|—IndexedDB: Full database features — databases, tables, primary keys, indexes, sorting, etc.
Sync vs Async
|—LocalStorage: Synchronous operations
|—IndexedDB: Asynchronous operations
Quick Summary
|—LocalStorage is just local storage, similar to reading and writing a small file.
|—IndexedDB is a web-based database supporting data storage and retrieval, search, sorting, transactions, and more — with much larger capacity.
IndexedDB: Databases and Tables
Similarly, since IndexedDB is very powerful,
it’s slightly more complex to use and requires some basic database knowledge.
Creating a Database
To work with IndexedDB, you first need a database. Here’s the code to create one:
window.indexedDB.open(databaseName);If the table structure has changed, you need to pass a new version to recreate it:
window.indexedDB.open(databaseName, version);The resulting db object is available in the onsuccess or onupgradeneeded callback. The full code:
/**
* open db
* @param {*} databaseName
* @param {*} version
* @returns
*/
export const openDB = (databaseName, version) => {
return new Promise((resolve, reject) => {
const request = version
? window.indexedDB.open(databaseName, version)
: window.indexedDB.open(databaseName);
request.onerror = (event) => {
reject(event.target.error);
};
request.onsuccess = () => {
resolve(request.result);
};
request.onupgradeneeded = (event) => {
resolve(event.target.result);
};
});
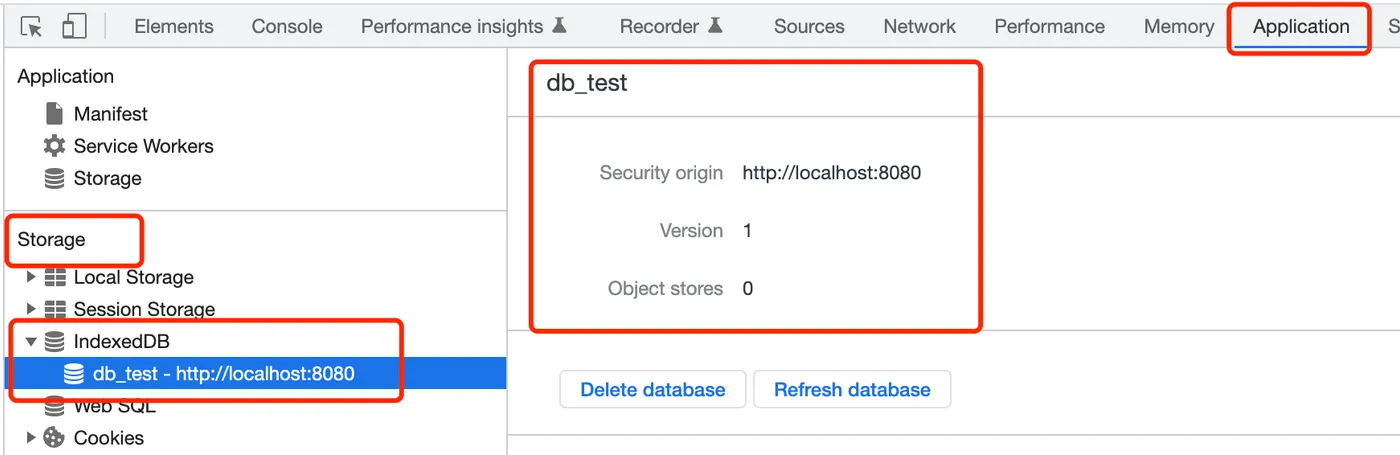
};After creation, you can see the database in Chrome DevTools under Application - Storage - IndexedDB:
Listing Databases
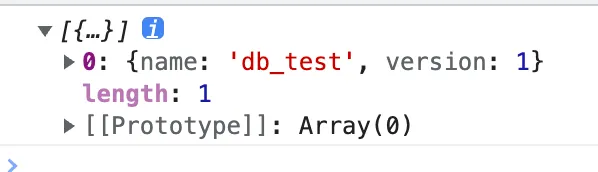
After creation, you can query the existing databases:
indexedDB.databases();This returns a list of local databases:
Deleting a Database
When a database is no longer needed, you can delete it:
indexedDB.deleteDatabase(databaseName);Creating a Table
Once you have a database, you can create tables:
db.createObjectStore(table.name, key);You need to pass the table name and key.
Creating an Index
After creating a table, you can create indexes:
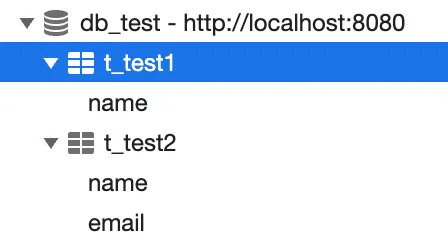
os.createIndex(name, index, { unique: unique });After creating tables and indexes, they will appear under the database:
Deleting a Table
Deleting a table is straightforward:
db.deleteObjectStore(tableName);IndexedDB: Data Operations
Once the database and tables are created, you can start working with data.
Adding Data
First create a transaction, then add data:
const tx = db.transaction([tableName], "readwrite");
const request = tx.objectStore(tableName).add(data);
Updating Data
Similarly, create a transaction and update data:
const tx = db.transaction([tableName], "readwrite");
const request = tx.objectStore(tableName).put(data);
Getting Data
Create a transaction and get data:
const tx = db.transaction([tableName], "readonly");
const request = tx.objectStore(tableName).get(key);
Data stored in the database looks like this:

Deleting Data
You can also delete data:
const tx = db.transaction([tableName], "readwrite");
const request = tx.objectStore(tableName).delete(key);
Clearing Data
const tx = db.transaction([tableName], "readwrite");
const request = tx.objectStore(tableName).clear();
Getting All Data
You can also get all data by a specific index:
const tx = db.transaction([tableName], "readonly");
const os = tx.objectStore(tableName);
const index = os.index(indexName);
const request = index.getAll();
qiao.db.js
I’ve packaged this into an npm module. Feel free to use it: https://code.insistime.com/#/qiao.db.js
|—Encapsulates database and table operations
|—Encapsulates data operations
Building a Todolist
Previously, we built a todolist using LocalStorage.
Article: Build a Todolist in One Article
Demo: https://insistime.com/dishi-ls
Code: https://github.com/uikoo9/dishi-monorepo/tree/localstorage
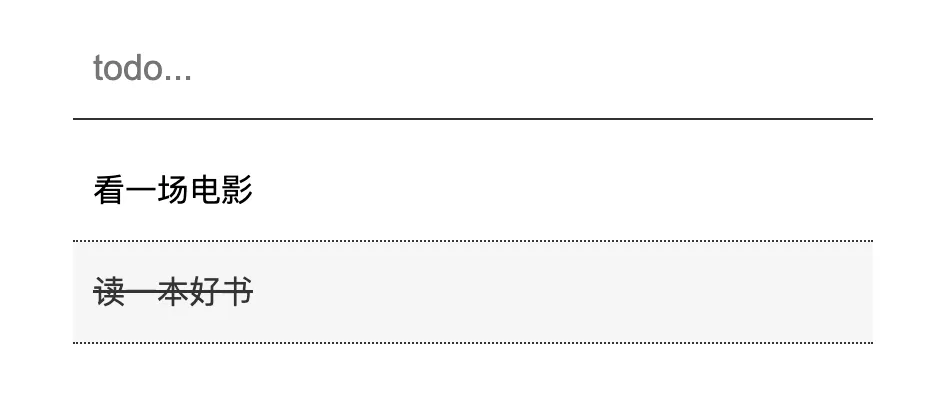
The functionality is simple — add todos and click to complete them:
Since LocalStorage lacks database features,
operations like sorting are cumbersome.
Here we’ll refactor it using IndexedDB.
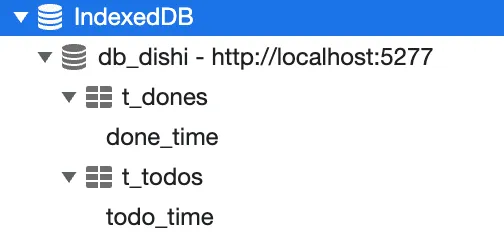
Table Structure
First, design a simple table structure:
db_dishi
    |-- t_todos
        |--create_time
        |--todo_content
        |--todo_time
    |--t_dones
        |--done_time
        |--todo_content
        |--todo_time
Where:
Database: db_dishi
Table t_todos: todo list, with create_time as primary key, todo_content for content, todo_time for the scheduled time
Table t_dones: done list, with done_time as primary key, todo_content for content, todo_time for the scheduled time
Creating the Database
-
Use the listDB method to get the database list and check if the database already exists
-
Use the openDB method to create the database
const dbName = "db_dishi";

// check
const dbs = await listDB();
if (dbs && dbs.length && dbs[0].name == dbName) return;

// db
const db = await openDB(dbName);
Creating Tables
-
Use the createTable method to create tables
-
Table t_todos
// table
const tableTodos = "t_todos";
const tableDones = "t_dones";
const tables = [
  {
    name: tableTodos,
    key: "create_time",
    index: [
      {
        name: "todo_time",
        index: ["todo_time", "todo_content"],
        unique: false,
      },
    ],
  },
  {
    name: tableDones,
    key: "done_time",
    index: [
      {
        name: "done_time",
        index: ["done_time"],
        unique: false,
      },
    ],
  },
];
await createTable(db, tables);
Table t_todos: primary key is create_time, index todo_time, indexed by todo_time and todo_content fields
Table t_dones: primary key is done_time, index done_time, indexed by done_time field
After creating the database and tables:
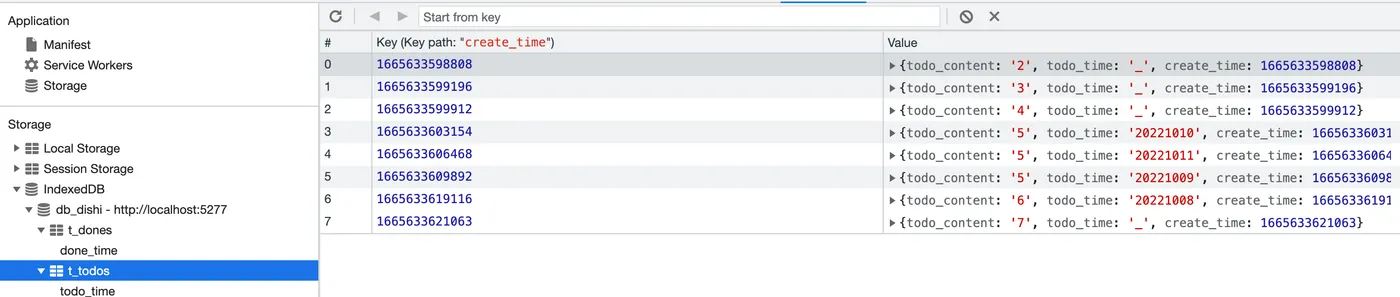
Adding Data
- Use the save method to add data
// save
const create_time = Date.now();
const data = {
  todo_content: todo_content,
  todo_time: todo_time || "_",
  create_time: create_time,
};
const db = await openDB(dbName);
const saveRes = await save(db, tableName, create_time, data);
console.log("add todo:", saveRes);
After adding some data, you can see it’s sorted by the primary key create_time by default:
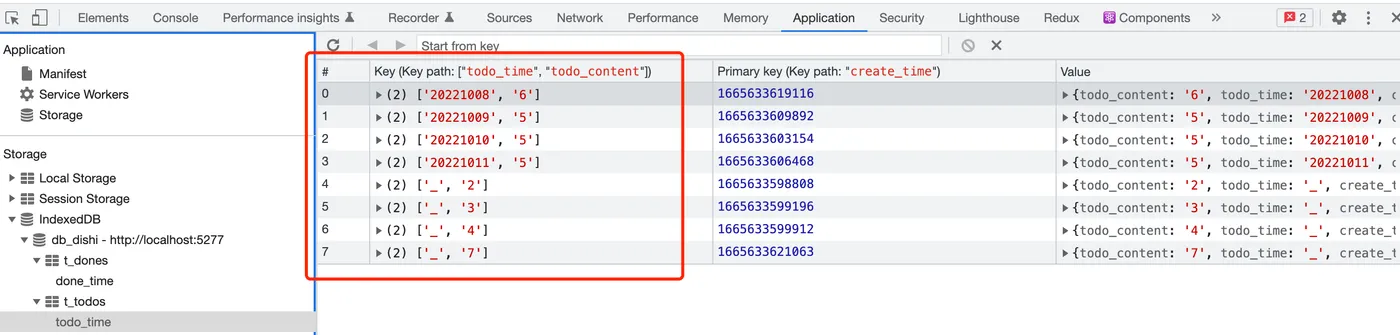
Click the todo_time index to see the data sorted by todo_time and todo_content:
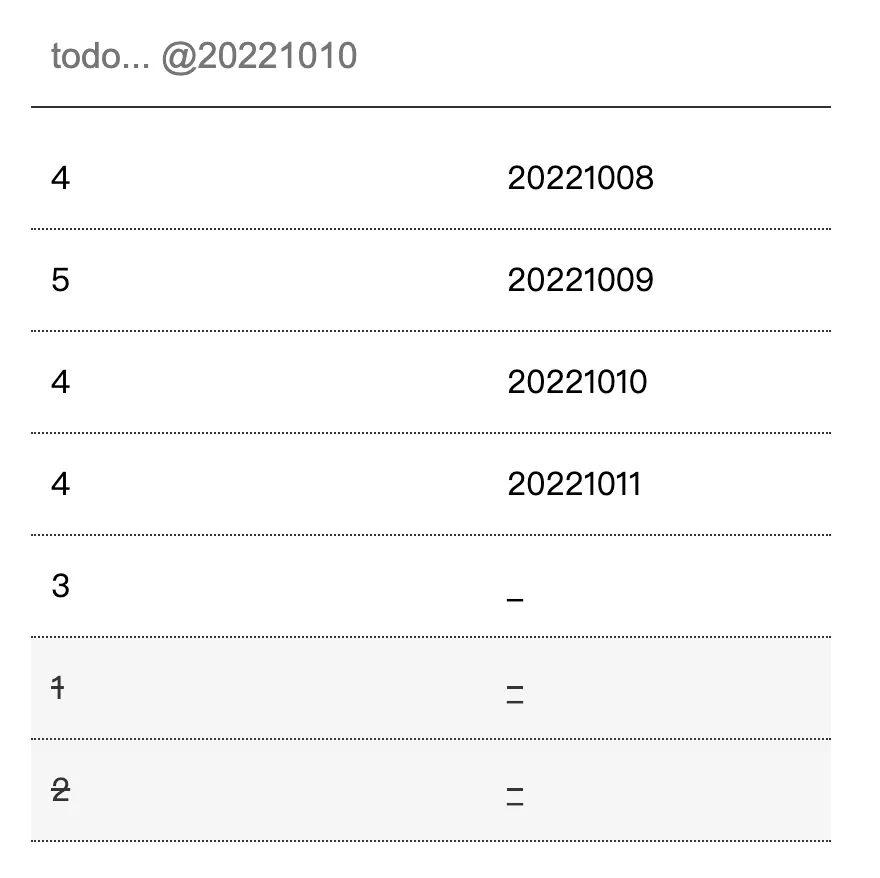
Getting Data
-
Use the getAll method to get all data from the todo_time index
-
This returns data sorted by the todo_time index rules, as shown above
const res = await getAll(db, tableName, "todo_time");
console.log(res);
Deleting Data
-
Use the get method to retrieve the todo
-
Use the del method to delete the todo
// todo
const db = await openDB(dbName);
const todo = await get(db, tableTodos, key);

// done
const done = {
  todo_content: todo.todo_content,
  todo_time: todo.todo_time,
  done_time: Date.now(),
};
const saveRes = await save(db, tableDones, null, done);

// del
await del(db, tableTodos, key);
console.log("del todo:", saveRes);
Final Result
-
Add a todo
-
Add todo@20221010, recording the scheduled time
-
Click a todo to mark it as done
Code: https://github.com/uikoo9/dishi-monorepo/tree/indexeddb
Live demo: https://insistime.com/dishi-indexeddb
Summary
-
Introduction to IndexedDB
-
Comparison between IndexedDB and LocalStorage
-
IndexedDB database and table operations
-
IndexedDB data operations
-
IndexedDB utility: https://code.insistime.com/#/qiao.db.js
-
Building a todolist with IndexedDB: https://insistime.com/dishi-indexeddb
Related Articles
Getting Started with Mantine UI
Preface: In 2023, which UI framework should you use for frontend development? Key requirements: PC and mobile support, dark/light theme switching, rich components, and React support. After comparing React UI libraries on GitHub, Mantine UI stands out for its extensive component library.
Using npm Workspaces for Frontend Monorepos
Migrating from lerna bootstrap to npm workspaces for monorepo dependency management — comparing lerna.json vs package.json config, node_modules location, and local package linking.
Initializing a Frontend Monorepo Project
Preface: This article documents the process of initializing a frontend Monorepo project, covering LICENSE, git configuration, package.json, commitizen, commitlint, rollup, ava, lerna, nx, prettier, eslint, and lint-staged.
A Lightweight JS Testing Framework: AVA
Common JS testing frameworks include Jest, Mocha, etc. This article introduces a lightweight JS testing framework: AVA.
Nx VS Lerna
Comparing NX and Lerna for monorepo management — task execution, local caching, distributed caching, dependency visualization, version management, and npm publishing.