Learn Electron in One Article
Preface
The powerful vitality of JavaScript has expanded frontend development into many areas:
Web development: building web applications with JS, HTML, CSS
Server-side development: building server applications with Node.js
Desktop development: building desktop apps with Chromium and Node.js
Mobile development: building mobile apps with WebView
Electron — Introduction
Desktop development — building apps for Mac and Windows —
is based on Chromium and Node.js.
Chromium
URL: https://www.chromium.org/chromium-projects/
Chromium handles the renderer process (UI layer). Chromium is the Chrome engine.
Since Chromium supports the latest JS, HTML, and CSS features,
implementing any UI is straightforward.
Node.js
URL: https://nodejs.org/dist/latest-v16.x/docs/api/
Node.js is a familiar cross-platform runtime with file, network, and other capabilities.
For example, it wraps file operations across Mac, Windows, and Linux into the fs module.
So Node.js handles the main process, abstracting away OS differences.
Electron
URL: https://www.electronjs.org/
Electron does roughly these things:
-
Embeds Chromium and Node.js, providing both renderer and main process capabilities
-
Provides IPC communication between the renderer and main processes
-
Implements OS-specific features like Mac icons, taskbar, etc.
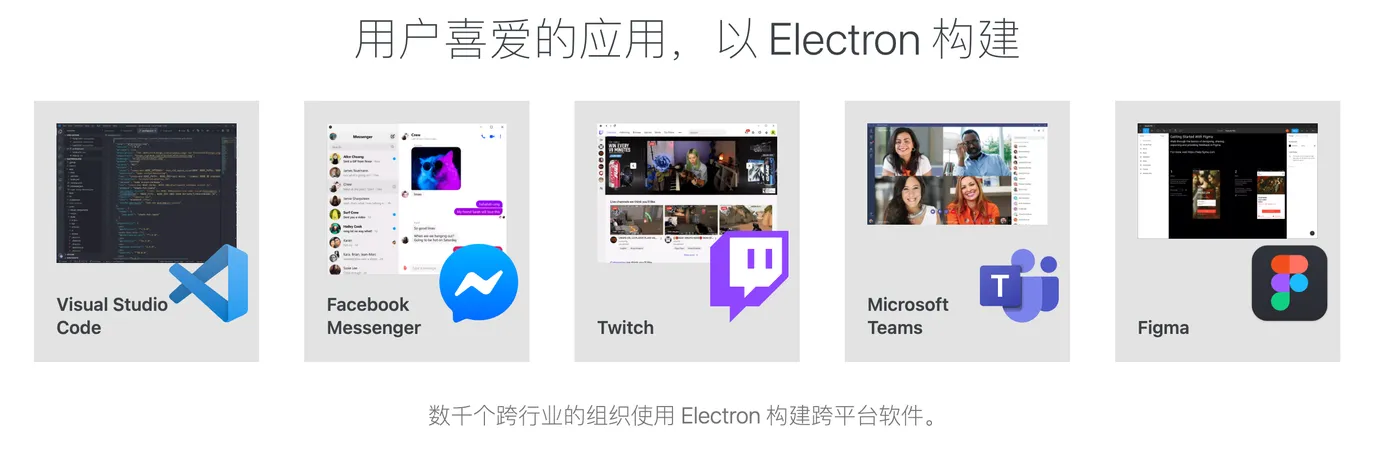
Electron Performance
URL: https://www.electronjs.org/apps
Cross-platform technologies are often challenged on performance.
The URL above lists apps built with Electron.
Many large applications use Electron —
for example: VSCode, Figma, Postman, Slack, Discord, and more.
The coverage is broad, from tools like VSCode and Postman to social apps like Slack and Discord.
This proves Electron’s performance is solid.
If your Electron app performs poorly, look at your own business code first.
Electron — Hello World
Electron provides an official getting-started example to run a hello world.
First, you need to install Electron.
Electron: Installation
Installing Electron is straightforward:
-D is used because the electron package provides the environment during development.
When building Mac/Windows apps, packaging tools will bundle Electron’s capabilities.
npm i -D electronNote that the first installation requires downloading Electron,
which is a large package — use a good network connection.
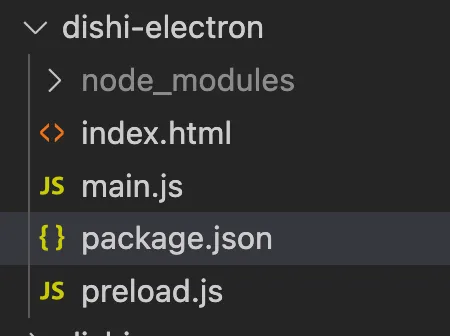
After installation, refer to the official example. It contains roughly these files:
index.html
This corresponds to the renderer process — the UI layer running on Chromium.
It’s just an HTML file. The content is simple, without even CSS:
<!--index.html-->
<!DOCTYPE html>
<html>
<head>
<meta charset="UTF-8" />
<!-- https://developer.mozilla.org/zh-CN/docs/Web/HTTP/CSP -->
<meta http-equiv="Content-Security-Policy" content="default-src 'self'; script-src 'self'" />
<meta http-equiv="X-Content-Security-Policy" content="default-src 'self'; script-src 'self'" />
<title>Hello World!</title>
</head>
<body>
<h1>Hello World!</h1>
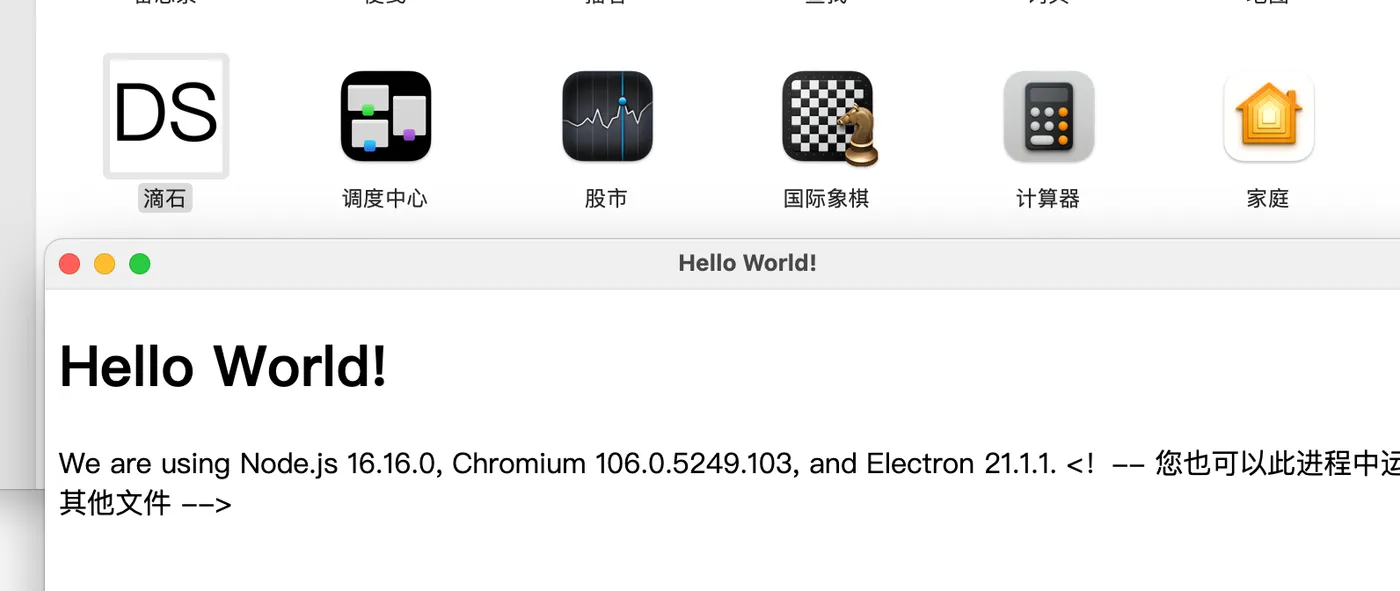
We are using Node.js <span id="node-version"></span>, Chromium <span id="chrome-version"></span>, and Electron
<span id="electron-version"></span>.
<script src="./renderer.js"></script>
</body>
</html>main.js
This corresponds to the main process, running in the Node.js environment.
The logic is simple — it creates a window,
loads a preload.js file for the window,
and listens for window events:
// main.js

// Modules to control application life and create native browser window
const { app, BrowserWindow } = require('electron');
const path = require('path');

function createWindow() {
  // Create the browser window
  const mainWindow = new BrowserWindow({
    width: 800,
    height: 600,
    webPreferences: {
      preload: path.join(__dirname, 'preload.js'),
    },
  });

  // Load index.html
  mainWindow.loadFile('index.html');

  // Open the DevTools
  // mainWindow.webContents.openDevTools()
}

// This method will be called when Electron has finished
// initialization and is ready to create browser windows.
// Some APIs can only be used after this event occurs.
app.whenReady().then(() => {
  createWindow();

  app.on('activate', function () {
    // On macOS it's common to re-create a window in the app when the
    // dock icon is clicked and there are no other windows open.
    if (BrowserWindow.getAllWindows().length === 0) createWindow();
  });
});

// Quit when all windows are closed, except on macOS. There, it's common
// for applications and their menu bar to stay active until the user quits
// explicitly with Cmd + Q.
app.on('window-all-closed', function () {
  if (process.platform !== 'darwin') app.quit();
});

// In this file you can include the rest of your app's specific main process
// code. You can also put them in separate files and require them here.
preload.js
The first question when developing with Electron is how to use Node.js capabilities.
There are two approaches:
|— Use them directly in the renderer layer (i.e. in JS included or referenced by index.html)
|— Inject a preload.js file when creating the window in the main process, register Node.js capabilities there, then use them in the renderer layer
The first approach has security risks, so the second is recommended.
However, the first approach — using Node.js directly in the renderer — is actually a feature of another desktop framework:
nwjs: https://nwjs.io/ — nwjs isn’t well maintained anymore, so it’s not recommended.
The preload.js example below uses Node.js’s process module:
// preload.js

// All of the Node.js APIs are available in the preload process.
// It has the same sandbox as a Chrome extension.
window.addEventListener('DOMContentLoaded', () => {
  const replaceText = (selector, text) => {
    const element = document.getElementById(selector);
    if (element) element.innerText = text;
  };

  for (const dependency of ['chrome', 'node', 'electron']) {
    replaceText(`${dependency}-version`, process.versions[dependency]);
  }
});
package.json
This file is simple — it depends on Electron and adds a script:
  "devDependencies": {
    "electron": "^21.1.1",
  },
  "scripts": {
    "start": "electron ."
  }
Run npm start to see the result:

That’s right — with just a few simple files, you already have a desktop app running.
Summary
The hello world example above contains Electron’s core principles:
-
index.html represents the renderer process. You’ll use HTML, CSS, JS to develop the UI layer. You can use any frontend stack — React, Vue, etc. It’s essentially like building a web page.
-
main.js represents the main process. OS-specific features, app event listeners, etc. are implemented here. This requires familiarity with Electron’s API, since Electron abstracts away OS differences.
-
preload.js represents Node.js capabilities. All Node.js capabilities needed by the renderer should be wrapped in preload.js. This requires familiarity with Node.js.
-
There’s still one missing piece — communication between the main and renderer processes.
Master these 4 concepts and you’ve essentially mastered Electron development. Study this example well.
Electron — Practice
Since this is a “learn Electron in one article” guide, just covering concepts would be dry.
Let’s introduce a practice project — learning through practice is faster.
A web-based todolist was previously developed.
We’ll continue building on that project.
For background, see these articles:
Build a Todolist in One Article
Learn IndexedDB in One Article
Hello world code: https://github.com/uikoo9/dishi-monorepo/tree/dishi-electron%400.0.3
In the packages/dishi-electron folder:
Electron — Extracting src
Note that Electron is imported as a dev dependency:
  "devDependencies": {
    "electron": "^21.1.1"
  },
This is because Electron development and building differ:
During development: depends on the electron npm package
During build: Electron capabilities are bundled into the app, not using the npm package directly
So the code above needs an extracted src folder containing only Electron business code:
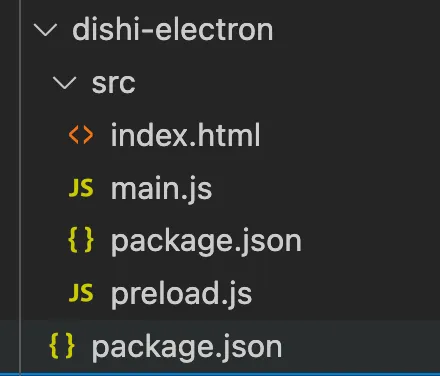
An src folder is extracted for index.html, main.js, preload.js, and package.json.
The outer folder also has a package.json, different from the one inside src.
Outer package.json:
Provides the Electron environment during development and handles packaging:
{
  "name": "dishi-electron",
  "private": true,
  "version": "0.0.4",
  "devDependencies": {
    "electron": "^21.1.1"
  },
  "scripts": {
    "start": "electron electron-src"
  }
}
Inner package.json:
Handles the Electron app’s business code, mainly providing the main.js entry point:
{
  "name": "dishi",
  "private": true,
  "version": "0.0.3",
  "main": "main.js"
}
Code: https://github.com/uikoo9/dishi-monorepo/tree/dishi-electron%400.0.5
Electron — Mac Packaging
We’ve already got an Electron app running locally.
Can’t wait to build and package it to share with friends?
Desktop app packaging and distribution involves two steps:
-
Build the application for the target OS — e.g. .app for Mac, .exe for Windows
-
Create an installer from the built application for distribution
Let’s start with step 1 — generating the application.
The officially recommended packaging tool is: https://www.electronforge.io/
This article uses another tool: https://github.com/electron/electron-packager
Since there’s a lot of packaging work ahead, a packaging tool has been created: https://qiao-electron-cli.vincentqiao.com/#/
qiao-electron-cli: Installation
First install the tool. Since it’s for packaging, install it in the outer folder:
npm i -D qiao-electron-cliqiao-electron-cli: Configuration
Create a pack folder alongside src, with a config file qiao-electron.config.js:
Each field is commented. Key fields to note:
arch: platform type, e.g. x64 for non-M1 Mac
srcPath, srcFiles: the extracted src folder and which files the final app needs
distPath: files from src are copied to dist to avoid packaging unnecessary files
// Main process package.json
const srcPkg = require('../src/package.json');
// config
let config = {
// App environment, e.g. online/test, appended to DMG installer name
appEnv: 'online',
// App name, defaults to name from main process package.json
appName: srcPkg.name,
// App version, shown in DMG name and About panel
appVersion: srcPkg.version,
// App icon
appIconPath: 'pack/static/icon/icon.icns',
// App copyright, shown in About panel
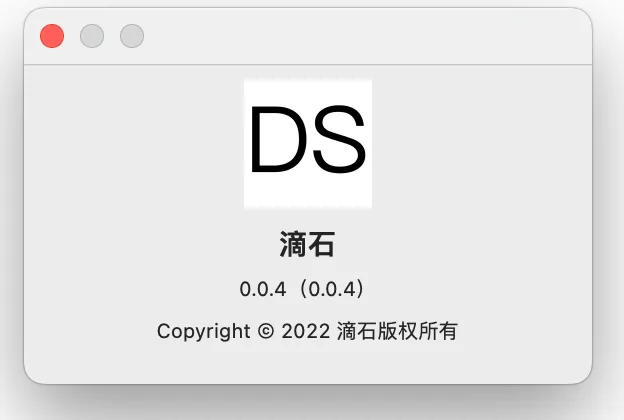
appCopyright: 'Copyright © 2022 dishi版权所有',
// App OS arch, see https://electron.github.io/electron-packager/main/interfaces/electronpackager.options.html#arch
arch: 'x64',
// Whether to use asar format for the app folder, default false
asar: false,
// Main process src path
srcPath: 'src',
// Files and folders to package into the app bundle, copied during dist step
srcFiles: ['index.html', 'main.js', 'preload.js', 'package.json'],
// srcFiles are copied to this directory
distPath: 'dist',
// Output path for app bundle and DMG installer
outPath: 'out',
// Background image for DMG installer
dmgBackground: 'pack/static/bg.png',
};
// qe config
module.exports = config;qiao-electron-cli: dist
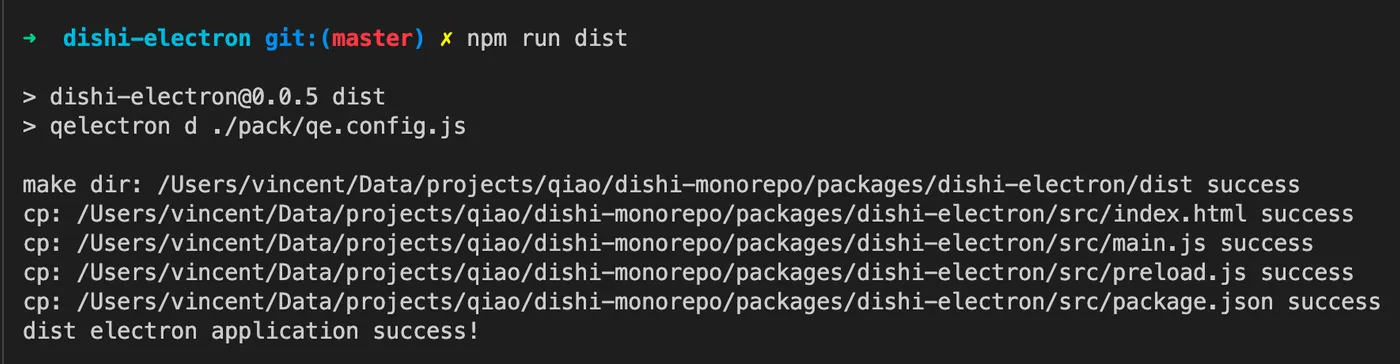
The dist command copies configured files from src to the dist folder, avoiding unnecessary files in the final package.
Run this command:
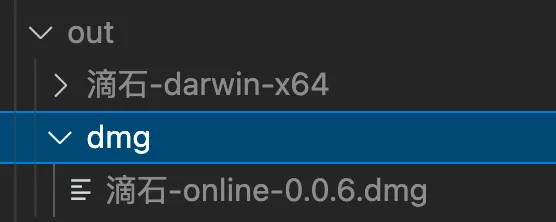
"dist": "qelectron d ./pack/qiao-electron.config.js",Result:
qiao-electron-cli: packmac
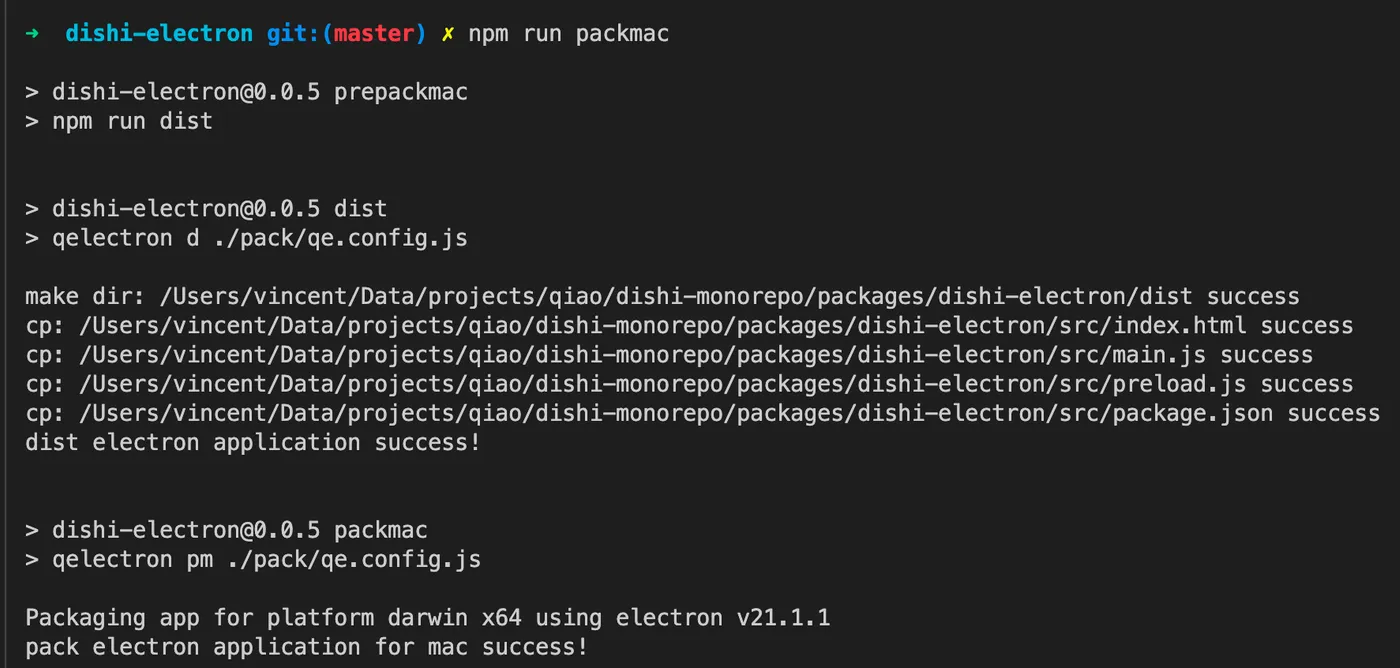
packmac generates the Mac application file. Add these commands to the outer package.json:
        "dist": "qelectron d ./pack/qiao-electron.config.js",
        "prepackmac": "npm run dist",
        "packmac": "qelectron pm ./pack/qiao-electron.config.js",
Run npm run packmac:
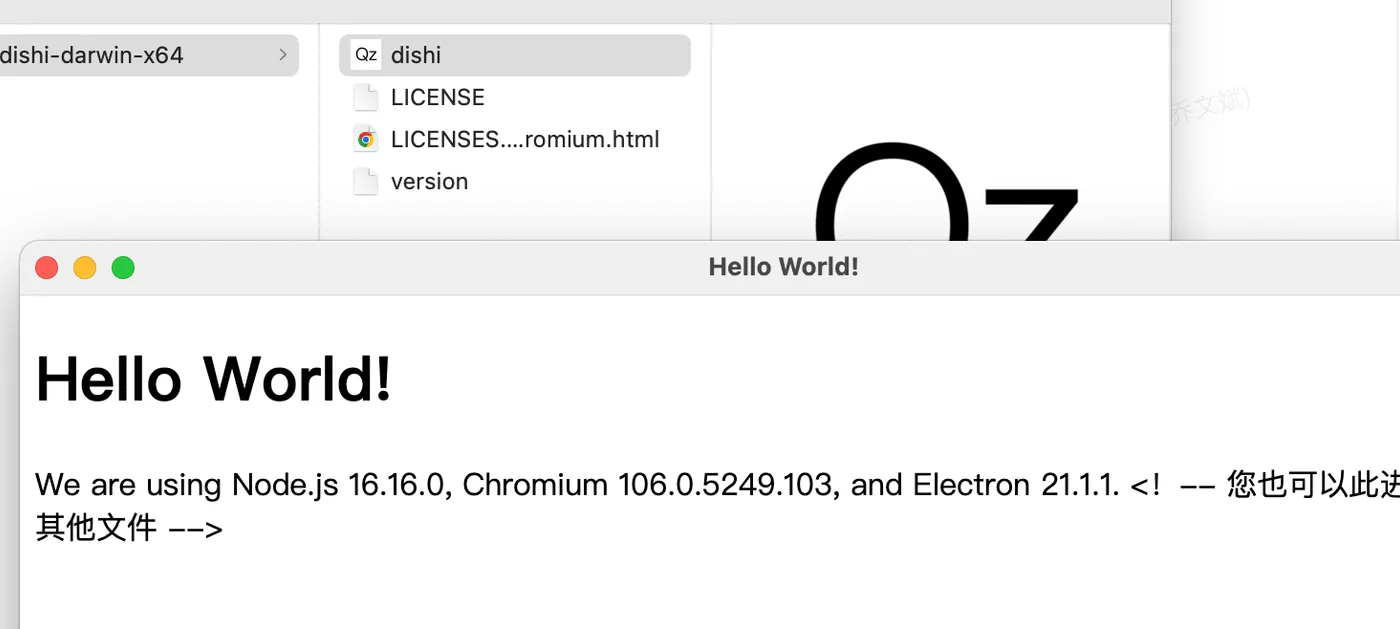
After running, a dist folder with files to package and an out folder with the generated Mac app appear alongside src:
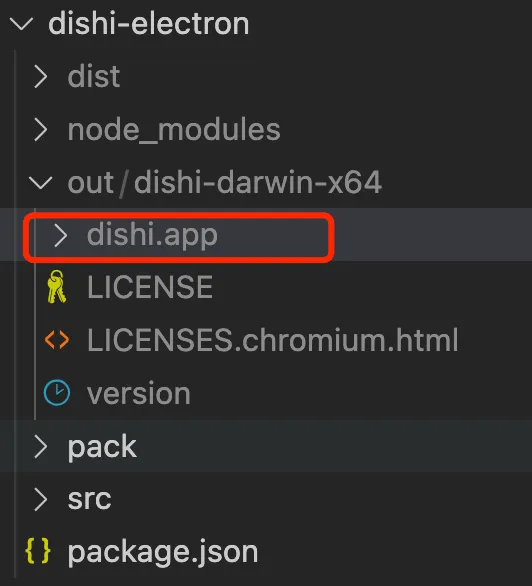
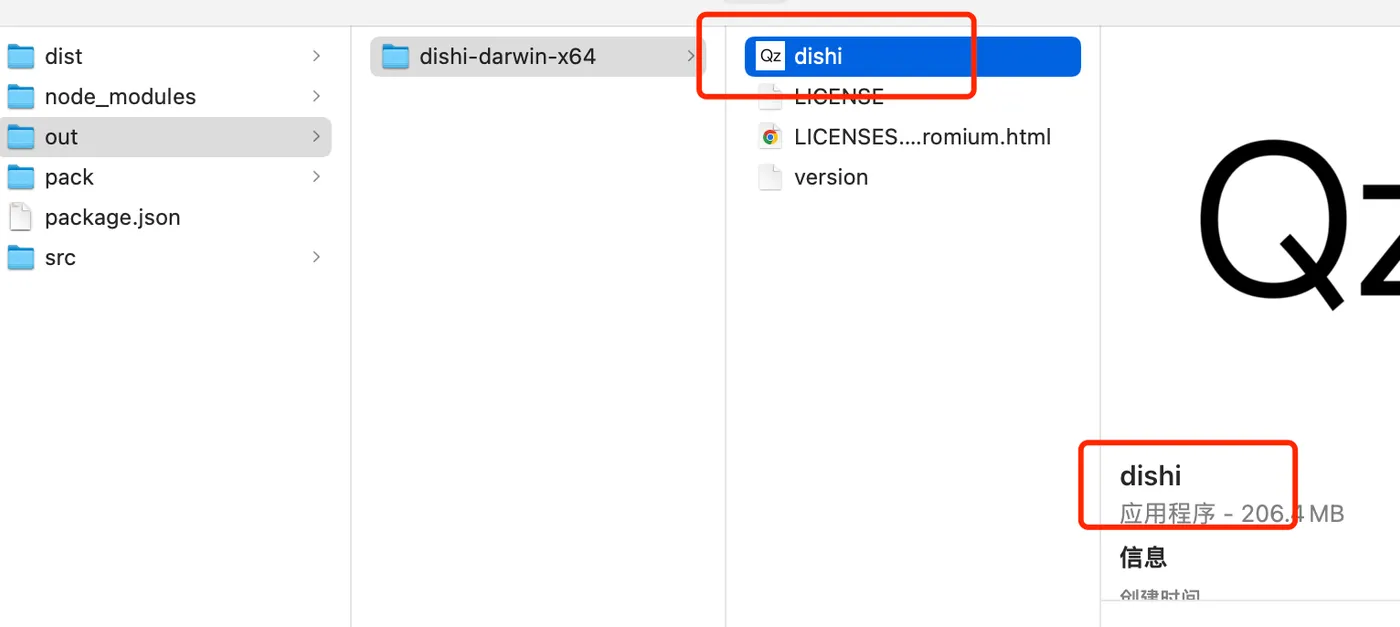
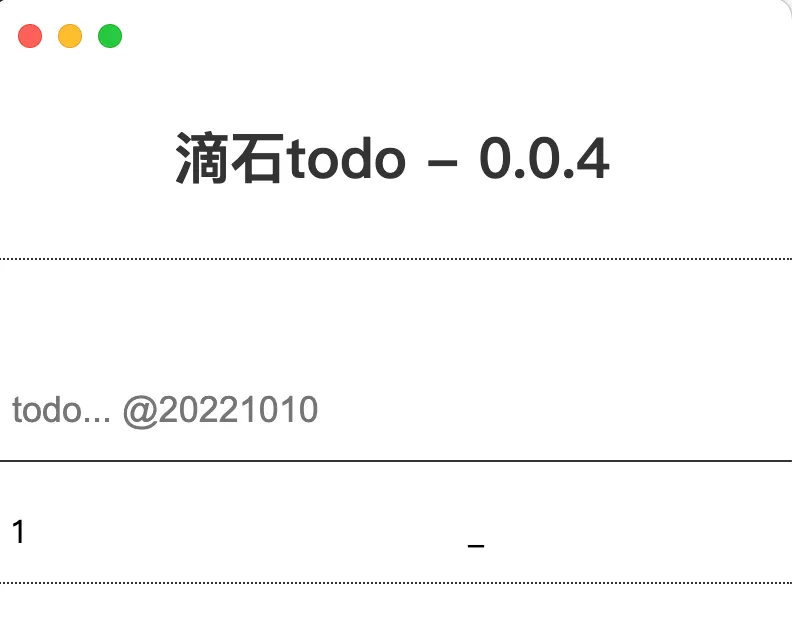
The dishi app in the out folder can be opened by double-clicking:
After opening:
Code: https://github.com/uikoo9/dishi-monorepo/tree/dishi-electron%400.0.6
qiao-electron-cli: icon
The Mac app icon from above looks like this — the Qz icon on the right:
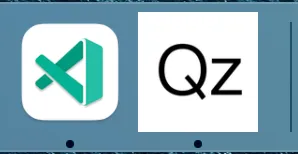
This icon was reused from another app. Let’s customize it.
The pack/qiao-electron.config.js config has an icon property:
    // App icon
    appIconPath: 'pack/static/icon/icon.icns',
The app icon needs an icns file.
Generating icns is tedious, so qiao-electron-cli wraps this.
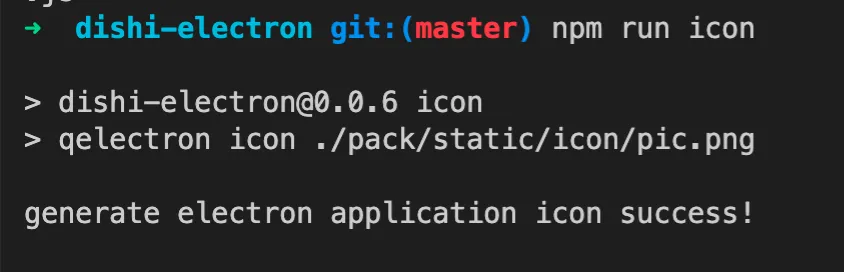
The icon command converts a regular PNG to icns.
Prepare a 512x512 image at pack/static/icon/pic.png,
then run:
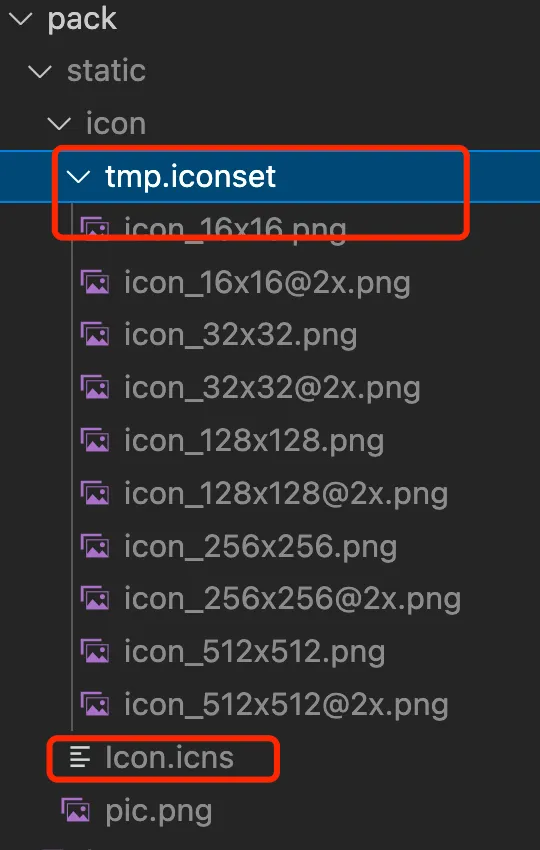
"icon": "qelectron icon ./pack/static/icon/pic.png",Result:
An icns file is generated in the icon folder:
Run npm run packmac again and check the icon:

Since the changes were all in ignored files, the code is still this version: https://github.com/uikoo9/dishi-monorepo/tree/dishi-electron%400.0.6
qiao-electron-cli: packdmg
After generating the local app and customizing the Mac icon, next is packaging.
Run this command:
"packdmg": "qelectron pd ./pack/qiao-electron.config.js",This generates a DMG file:
Opening the DMG:
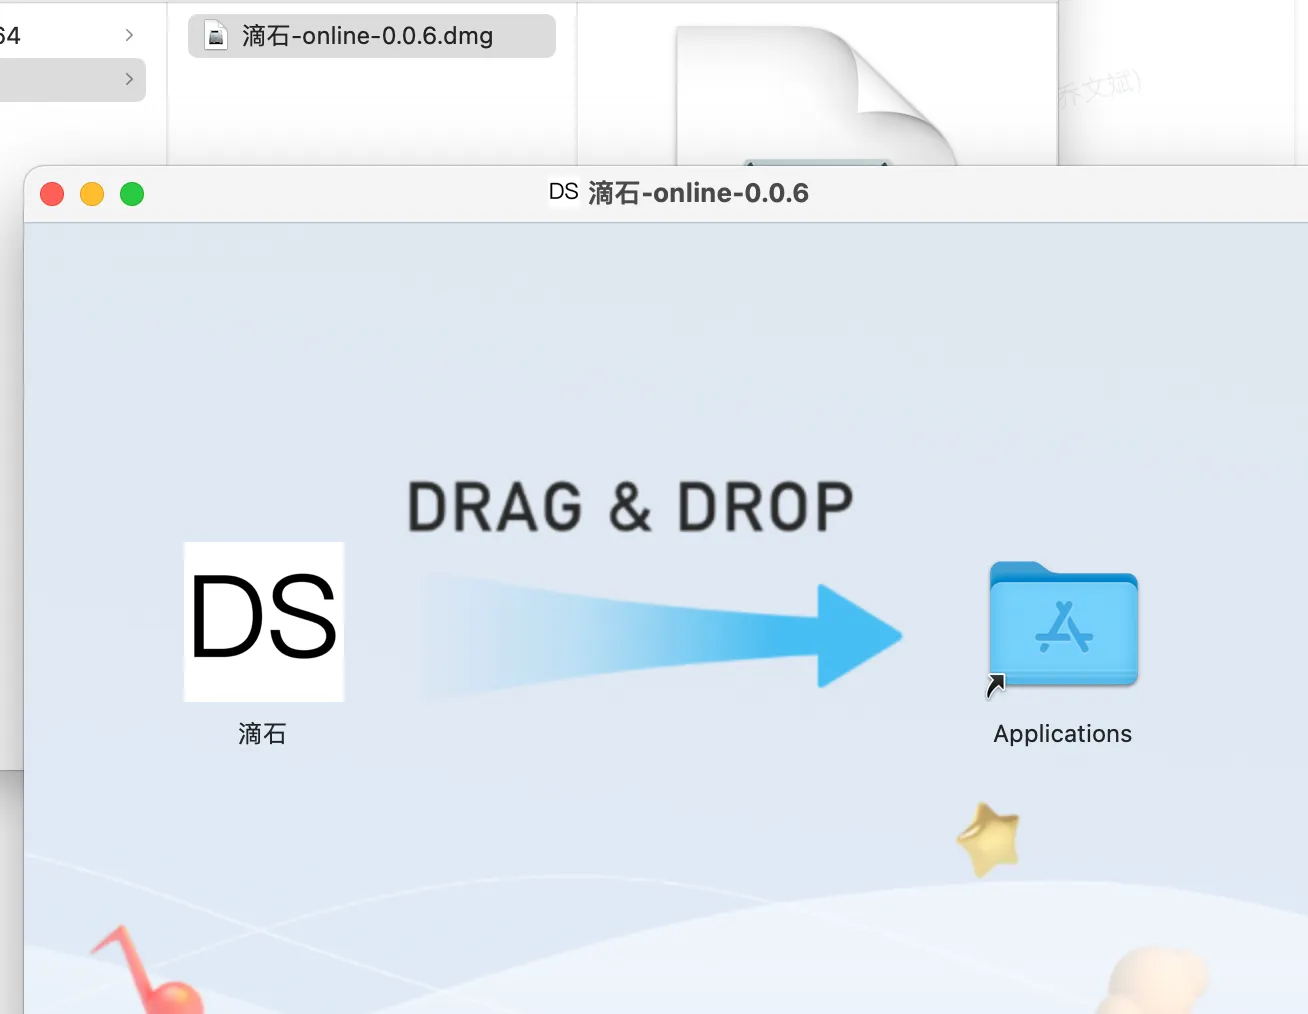
The left side shows the app name from qiao-electron.config.js:
appName: '滴石',The icon on the left and in the title comes from:
appIconPath: 'pack/static/icon/icon.icns',The background image comes from:
dmgBackground: 'pack/static/bg.png',Opening the DMG also creates a desktop icon — the installer icon:
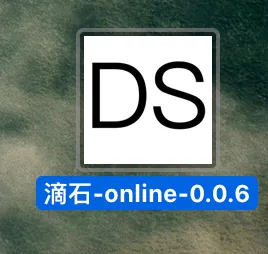
Drag the app to the Applications folder on the right, and you’ll find the launch icon in Applications:
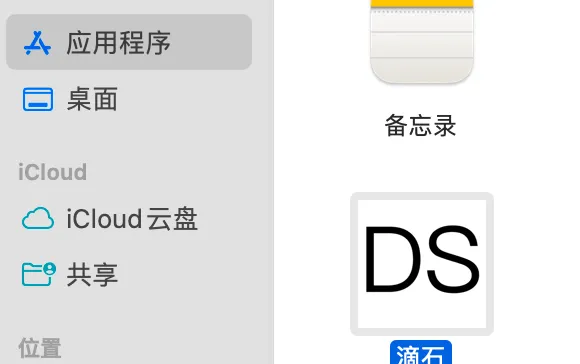
After launching:
Code: https://github.com/uikoo9/dishi-monorepo/tree/dishi-electron%400.0.7
qiao-electron-cli: uploaddmg
After generating the DMG, you can upload it to a file server like COS for easy distribution.
qiao-electron-cli includes an uploaddmg command for uploading to COS.
Configure the COS config in qiao-electron.config.js:
// cos config — configure COS for direct upload
const cosConfig = require('./config.json');
config.cosConfig = {
  SecretId: cosConfig.SecretId,
  SecretKey: cosConfig.SecretKey,
  Region: cosConfig.Region,
  Bucket: cosConfig.Bucket,
  destPath: '21_dishi/dmg',
};
Then run:
"uploaddmg": "qelectron ud ./pack/qiao-electron.config.js"Code: https://github.com/uikoo9/dishi-monorepo/tree/dishi-electron%400.0.8
Electron — Mac Customization
At this point we’ve learned:
-
Electron: introduction
-
Electron: installation
-
Electron: hello world
-
Electron: packaging Mac apps
-
Electron: customizing Mac icons
-
Electron: packaging Mac installers
Web Project
The content above was all based on hello world. Let’s continue with a previous web project:
URL: https://insistime.com/dishi-indexeddb
Article: https://blog.insistime.com/indexeddb
Code: https://github.com/uikoo9/dishi-monorepo/tree/indexeddb
This web project is essentially a local app based on IndexedDB,
so it’s well-suited for embedding in Electron.
Using a new webpack config in the dishi-web project, build the output to dishi-electron/src/renderer:
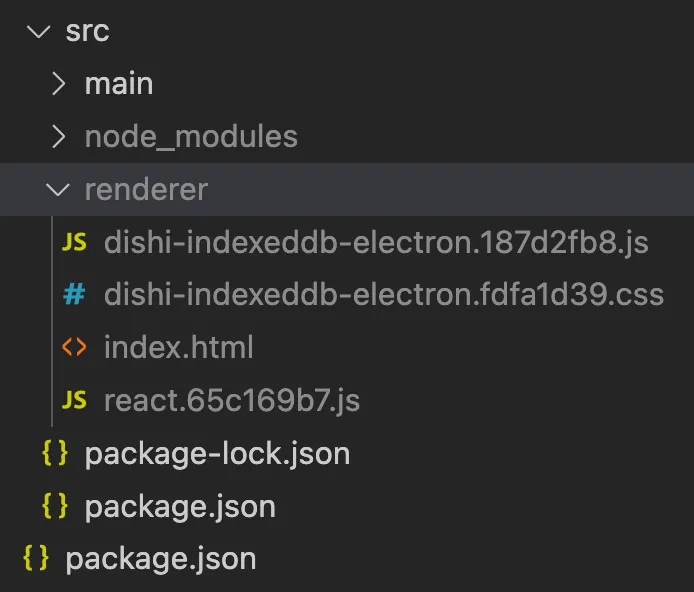
Main Process File Adjustments
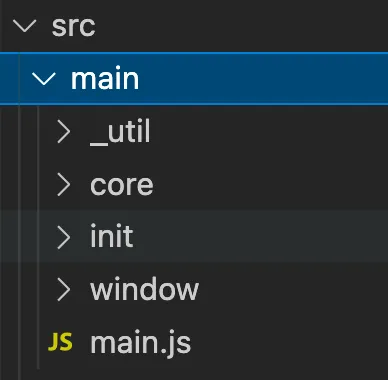
Since src now has a renderer folder, add a corresponding main folder for main process code.
The main process introduces another utility npm package for Electron capabilities: https://code.insistime.com/#/qiao-electron
After adjustments:
Custom Menu and About Panel
The previous app launched with a default menu:
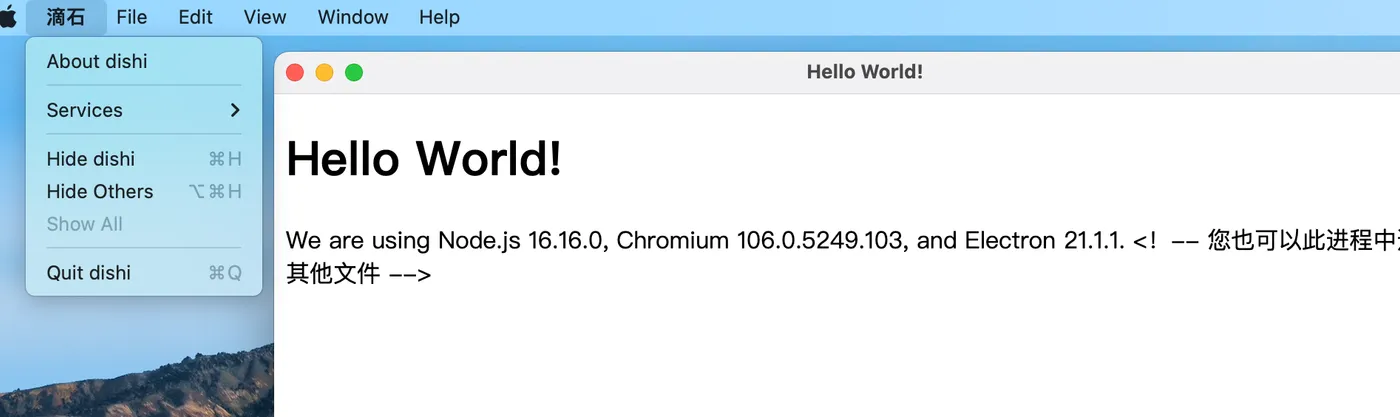
Using qiao-electron’s methods, you can customize the menu. Code in src/main/init/init-menu.js:
'use strict';

// q
const { setApplicationMenu, setAboutVersion } = require('qiao-electron');

// version
const { version } = require('../../package.json');

// set application menu
setApplicationMenu();

// set about version
setAboutVersion(version);
After customization:


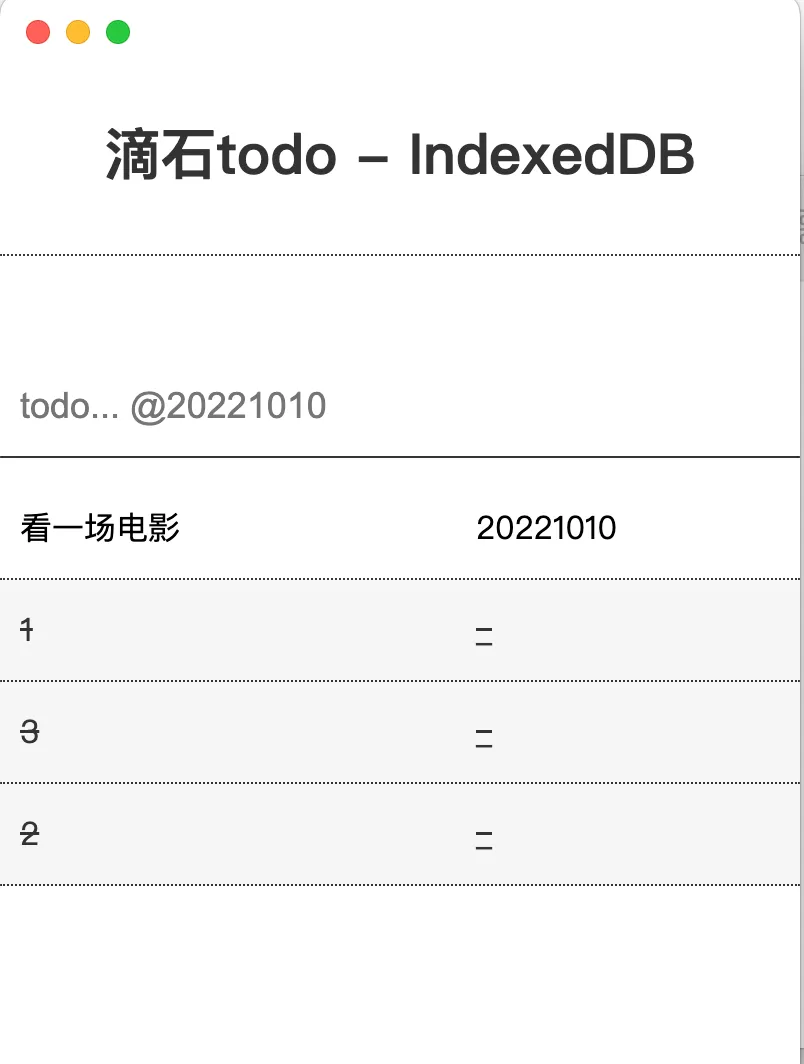
Custom Title Bar
The current title bar looks like this:

It’s not great looking. You can hide the title bar by adding this property when creating the window:
titleBarStyle: 'hiddenInset',After hiding:
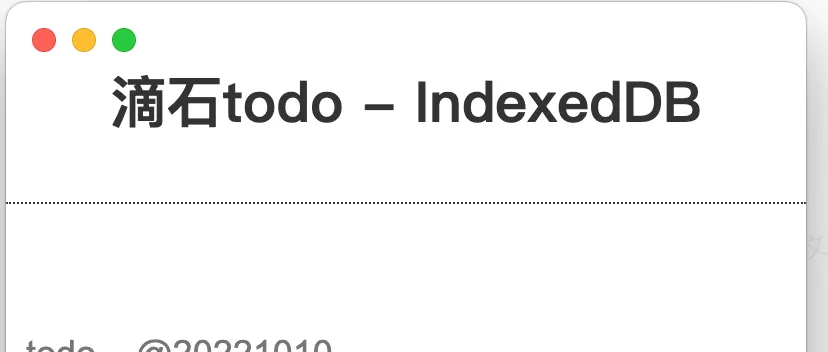
But the top area is no longer draggable. You need to update the HTML and CSS —
add a title element and adjust the CSS accordingly:

Now the top is draggable and the title bar is hidden.
Final result:
Code: https://github.com/uikoo9/dishi-monorepo/tree/dishi-electron%400.1.2
Electron — Processes and Communication
As mentioned above, Electron has a main process and a renderer process.
Renderer process: develops the UI
Main process: handles OS-related tasks
Using Mac’s Activity Monitor to inspect the running processes of this project —
since the app is called DiShi, just search for it:
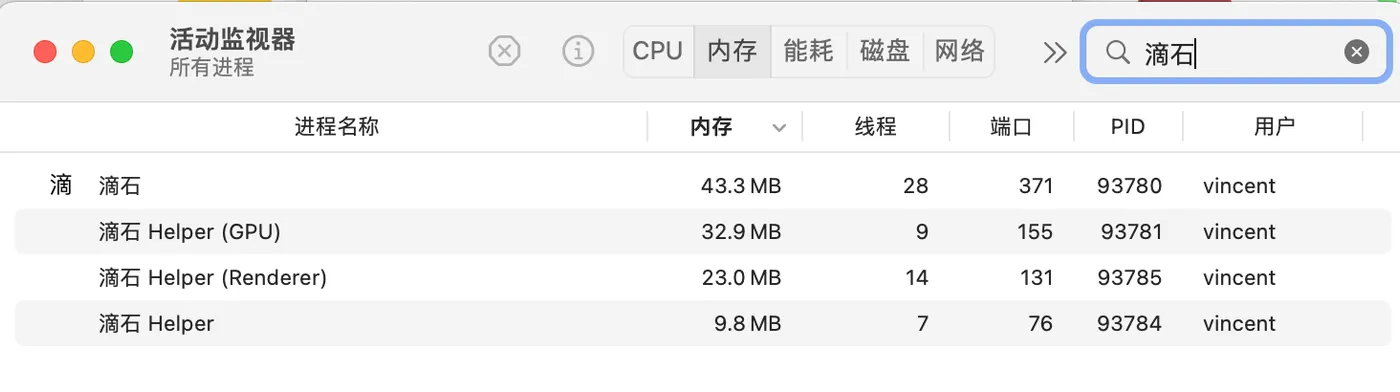
The first one is the main process, and the renderer ones are renderer processes.
Here’s a simple IPC demo — the renderer process gets the app version from the main process.
The main process listens via ipcMain:
ipcMain.handle(IPC_APP_GET_VERSION, () => {
  return version;
});
The renderer process gets the version via ipcRenderer:
/**
 * appGetVersionIPC
 * @returns version
 */
export const appGetVersionIPC = async () => {
  return await ipcRenderer.invoke(IPC_APP_GET_VERSION);
};
Put the above code in the window’s preload.js, then call it from the renderer process JS:
const v = await window.electron.appGetVersionIPC();The preload.js in the renderer process provides a method to get the version, which communicates with the main process via IPC. Result:
Electron — Useful Libraries
qiao-electron
1. https://code.insistime.com/#/qiao-electron
- Wraps many common Electron capabilities
qiao-electron-cli
1. https://qiao-electron-cli.vincentqiao.com/#/
- Wraps Electron packaging capabilities
Summary
At this point, we’ve developed a complete Mac app with Electron.
Code: https://github.com/uikoo9/dishi-monorepo/tree/electron
-
Electron — introduction
-
Electron — installation
-
Electron — hello world
-
Electron — packaging Mac apps with qiao-electron-cli’s packmac command
-
Electron — creating Mac icons with qiao-electron-cli’s icon command
-
Electron — packaging Mac DMG installers with qiao-electron-cli’s packdmg command
-
Electron — uploading DMG to COS with qiao-electron-cli’s uploaddmg command
-
Electron — customizing Mac menus with qiao-electron
-
Electron — customizing Mac About panel with qiao-electron
-
Electron — Mac custom titlebar-less app
-
Electron — processes and communication
-
Electron — getting app version with qiao-electron
-
Electron — Electron column: https://blog.csdn.net/uikoo9/category_11468921.html